How to Use a Knife Sharpener Correctly
Set the sharpener on a stable surface, match the angle to your knife, and use light, steady strokes from heel to tip. With a pull-through, draw the blade toward you through each slot a few times. With a guided manual kit, lock the angle and work one stone at a time. Go slowly, keep your fingers clear of the edge, and stop when the edge bites cleanly.
 WORK SHARP WSGFS221Best overall
 Chef's Choice 0101500Electric 15° edge converter
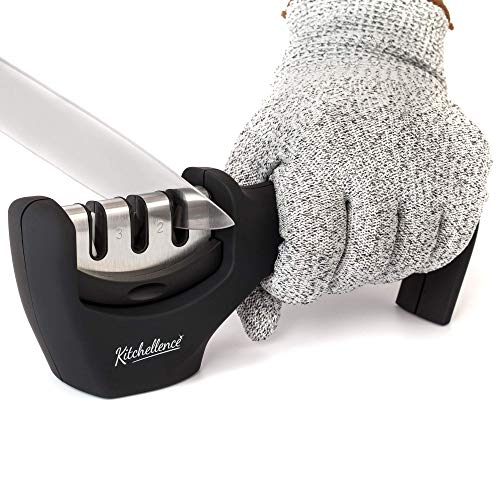 KITCHELLENCE KS37 PSafest for beginners
Start with the type of sharpener you own
The right technique depends on the tool in your hand. A pull-through sharpener has fixed slots, so the tool sets the angle and you supply the motion. A guided manual kit holds the angle with a clamp or guide, and you move a stone or rod across the edge. An electric unit uses a motor, so your job is mostly to guide the blade and let it work.
If you are still choosing, our best knife sharpener page puts stages, angles, grit and weight on one spec sheet. The table below sums up how each type is used.
| Type | How you use it | Angle control | Skill needed |
|---|---|---|---|
| Pull-through | Draw the blade through fixed slots | Set by the slots | Low |
| Guided manual | Clamp the blade, set a guide, stroke the stones | You choose within the kit's range | Moderate |
| Electric | Feed the blade through motor-driven stages | Usually set by built-in guides | Low |
Set up safely before you sharpen
Most sharpening cuts happen when the tool slides or the knife slips. A few minutes of setup prevents both.
Wear eye protection if you are using an electric unit or a coarse diamond surface, since fine metal particles can fly off. If you are new to sharpening, a cut-resistant glove on your guiding hand is a sensible precaution. Some pull-through kits include one, such as the Kitchellence 3-stage kit, which also has a non-slip base.
- Place the sharpener on a flat, dry surface at a comfortable height.
- Check that the base or grip will not slide. If it can, put a damp towel underneath.
- Wash and dry the knife so oil and food residue do not clog the abrasive.
- For electric models, keep the cord and your hands dry and away from water.
- Keep your fingers behind the spine of the blade at all times.
How to use a pull-through sharpener
Pull-through sharpeners are the quickest to learn. They usually have two to four slots, from coarse to fine, and some add a dedicated slot for serrated blades. For example, the Orange Ninja 4-stage model lists coarse, medium, fine and serrated slots.
Hold the handle with one hand and keep the sharpener steady with the other, or use the non-slip base. Then follow these steps.
- Start in the coarse slot only if the knife is dull or damaged. If it is just a little soft, go straight to the medium or fine slot.
- Place the heel of the blade, the part nearest the handle, at the top of the slot.
- Press down with light to medium pressure, about what you would use to slice a tomato.
- Pull the knife toward you in one smooth motion, following the curve of the blade so the tip finishes at the end of the slot.
- Repeat three to five times, then move to the next finer slot.
- Finish in the fine slot, wipe the blade clean and rinse it.
How to use a guided manual sharpener
A guided kit gives you more control, which helps with thin kitchen knives and thicker outdoor blades. The Work Sharp Precision Adjust Elite, for example, lists an adjustable 15° to 30° range. Its listing suggests 15° for Japanese-style knives, 20° for Western kitchen knives, 25° for hunting blades and 30° for cleavers. Fixed-guide kits such as the Work Sharp Guided Field Sharpener offer built-in 20° and 25° guides instead.
The basic routine is the same for most guided kits.
- Clamp the blade or rest it on the guide so it cannot shift.
- Choose the angle that matches the existing edge. If you are unsure, 20° is a common starting point for Western kitchen knives.
- Begin with the coarser stone only if the edge is dull or chipped.
- Use even strokes from heel to tip, with the same number on each side.
- Move to the finer stone, then a ceramic rod or strop if your kit has one.
- Use the serrated rod for scalloped edges, working one tooth at a time.
Keep a steady angle and light pressure
Angle is the part most people get wrong. A lower angle makes a thinner, sharper edge that suits delicate slicing. A higher angle makes a tougher edge for heavier work. If you change the angle a lot between strokes, you round the edge instead of refining it.
Match your angle to the knife's current bevel when you can. Switching a knife from 20° to 15° removes more metal and takes longer, which is why some electric models are sold specifically as edge converters. The Chef'sChoice 15XV lists a 15° to 20° range and uses spring guides to help hold the angle.
More pressure does not mean a sharper knife. Heavy force can overheat or scratch the edge and wear the abrasive faster. Let the grit do the cutting.
Check the edge and clean up
After the final stage, rinse the blade, dry it and check the edge. A freshly sharpened knife should slice cleanly through a sheet of paper held by one corner, or glide through a ripe tomato skin without pressing hard. Always test with the knife moving away from your hand.
If the knife still drags, repeat the previous stage a few more strokes, then finish on the fine stage again. Wipe metal dust off the sharpener with a damp cloth, and let it dry before storing.
Common mistakes to avoid
Most poor results come from a short list of habits. Fixing them improves the edge more than buying a different tool.
- Sawing back and forth in a pull-through slot. Pull in one direction only.
- Using the coarse stage every time. Save it for dull or damaged blades.
- Sharpening a serrated knife in a straight-edge slot. Use a slot or rod made for the teeth.
- Skipping the fine stage, which leaves a rough, short-lived edge.
- Rushing the last few strokes, when the angle tends to wander.
Frequently asked questions
How often should I sharpen a kitchen knife?
Sharpen when the knife starts to crush tomatoes or slip on onion skin instead of cutting. Light touch-ups on a fine stage are better than waiting until the edge is badly dull.
Can I use a pull-through sharpener on any knife?
Not always. Check that the slots suit your blade type, and confirm serrated support before using it on bread or steak knives. Some sharpeners are listed for straight edges only.
Do left-handed users need a different sharpener?
Not usually. Several pull-through listings describe handles that work for right or left hands. A guided kit works the same either way.
Should I lubricate the sharpener?
Follow the maker's instructions. Many pull-through and diamond units are made for dry use, and adding oil or water can clog or damage some abrasives.