Why Your Upholstery Staple Remover Isn't Working (and How to Fix It)
Most upholstery staple removers fail because of a mismatch between the tool tip and the staple, not because the tool is useless. The usual culprits are a tip that is too thick or soft, a staple driven flush into dense wood, or prying at the wrong angle. Changing your technique, adding a second tool for the leftovers, or switching to a hardened tip usually solves it.
 meillyocean ME-QDQ4PS-100Best overall
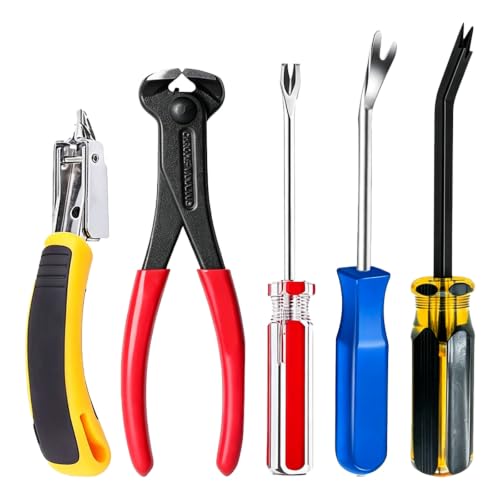 GOROBU Staple-remover-5pcTies for most pieces
 Fifatopo QDQ-StyleRust resistant hardened set
The most common reasons a staple remover fails
A staple remover has one job: get a thin, hard tip under the crown of the staple and lever it up. Anything that stops the tip from getting under the crown, or that makes the tip flex, will make the tool seem broken.
Here are the causes that come up most often:
- The staple is sunk flush or below the fabric or wood surface, so there is no gap to slip under.
- The tip is thick, rounded or worn, so it skates over the crown instead of sliding beneath it.
- The steel is soft and bends or chips under load, especially in hardwood or plywood.
- You are prying straight up instead of rocking the tool against a fulcrum.
- The staple is rusted, bent over or already half broken, so the crown snaps and the legs stay behind.
- The handle is slippery or too small for your hand, so you cannot hold the tip steady.
Match the symptom to the fix
Different failures point to different causes. This table gives a quick way to work out what is going on before you change tools or buy anything.
| What you see | Likely cause | What to try |
|---|---|---|
| Tip slides off the staple | Tip too blunt or staple sunk flush | Work a thin screwdriver or tack lifter under one end first, then switch to the remover |
| Tip gets stuck in the wood | Prying too steeply or tip too wide | Lower the angle and lift one side of the crown at a time |
| Tool bends or chips | Soft steel or too much force on one point | Use a hardened tip and take smaller bites |
| Staple crown snaps, legs stay in | Old or rusted staple, or lifting too fast | Grip the legs with needle-nose or end cutting pliers and pull along the staple line |
| Tool slips out of your hand | Smooth handle or hand fatigue | Use a rubber or non-slip grip and take breaks |
| Fabric tears or wood gets gouged | Tip digging in, no protection | Slide the tool in parallel to the surface and use a fulcrum base |
A step-by-step method that works on stubborn staples
Technique matters as much as the tool. Take a minute to set up, and the staples tend to come out more cleanly.
Follow these steps in order:
- Look at the staple first. Find the crown (the flat top) and note which way it runs relative to the wood grain.
- Position the work so it is stable and well lit. Clamp or brace it so it cannot shift as you pry.
- Slide the tip under one end of the crown, keeping the tool nearly flat against the surface.
- Rock the handle to lift that end a little. You only need a small gap.
- Move to the other end and repeat until the staple stands proud.
- Grip the raised staple with pliers and pull it straight out along its legs.
- Brush away debris and check the hole before moving on, so loose fragments do not catch the next staple.
When the tool itself is the problem
Sometimes technique is fine and the tool really is the limit. The biggest factor is blade steel. A hardened tip can slide under a staple and resist bending, while a soft tip folds or rounds over in dense wood. Our best upholstery staple remover comparison lists chrome vanadium, high carbon and alloy steel as the types found on the products we compared, and it notes that a listing which only says steel gives you nothing to judge by.
Tip shape and leverage matter too. For example, the DneyLerf DLF003 lists a 30° angled chrome vanadium steel rod with twin prongs and a curved fulcrum base, and it measures 8.46 in long, the longest single remover on our page. Longer tools give more leverage, though the maker's numbers are only the published specifications.
A single remover also cannot do everything. Sets such as the GOROBU 5-piece kit pair a lifter with pliers and tack pullers, which is helpful for broken staples and tacks that stay behind. If your staples keep snapping, a way to grab the leftovers may fix the problem better than a stronger lifter.
Why removers keep breaking or coming apart
If a tool bends, chips or loosens at the handle, look at how it is being used before blaming the maker. Using a staple remover as a pry bar on large nails or as a chisel puts side loads on a thin tip. Hammering on the handle can also loosen the joint between the steel and the grip.
Rust is another factor. A tool left damp in a toolbox can pit, and pitted steel catches and snaps more easily. Several products on our comparison page list rust resistance, but a quick wipe and dry storage helps any tool. If you work with hundreds of staples, tools with a rubber or non-slip handle also reduce the grip strain that leads to slips and awkward angles.
Safety notes
Staples and tack fragments fly when they snap free, so wear safety glasses every time. Sharp tips can slip and puncture your hand, so keep your free hand out of the line of travel and never hold the work against your body while prying.
Wear work gloves if you are handling rusted staples, and take care around exposed legs left in the frame. If you are working on an older piece, avoid creating dust from old foam or fabric, and wear a dust mask in poorly ventilated spaces. Unplug any nearby power tools before reaching into a frame, and stay clear of wiring if you are reupholstering anything with built-in electrics.
Avoiding the problem on the next project
Much of the pain of removal comes from how the staples went in. Staples driven too deep or at odd angles are harder to lift later. If you are rebuilding the piece, choose a gun and staple length that suit the wood, and keep the gun square to the surface. Our best upholstery staple gun for beginners page compares options for people who are still building a feel for depth and spacing.
For the next removal job, keep a small kit at hand: one hardened lifter, one tack puller and a pair of pliers. That combination covers most of the failures described above.
Frequently asked questions
Should I use a flathead screwdriver instead?
A thin flathead can help start a flush staple, but it is not designed for repeated prying. Use it to raise one end, then switch to a proper remover or pliers.
Can I sharpen a dull staple remover tip?
A light touch with a fine file can clean up a rounded tip, but filing can remove the hardened surface. If the tip is badly worn or chipped, replacing the tool is usually the better choice.
Do I need to remove every staple?
For reupholstery you should clear the old staples so new ones seat properly and the fabric lies flat. Leftover staples can also snag fabric or injure your hands.
Why do the staple legs stay in the wood?
The crown often snaps before the legs release, especially with rusted or old staples. Grip the legs with needle-nose or end cutting pliers and pull them out in line with the staple.