What's the Easiest Way to Remove an Oxygen Sensor?
The easiest way to remove an oxygen sensor is to unplug it, soak the threads with penetrating oil, and turn it out with a slotted O2 sensor socket on a ratchet or breaker bar. Do it when the exhaust is warm but not hot, because a slightly warm sensor usually turns more freely than a cold one. A regular socket will not work, since the sensor's wire gets in the way.
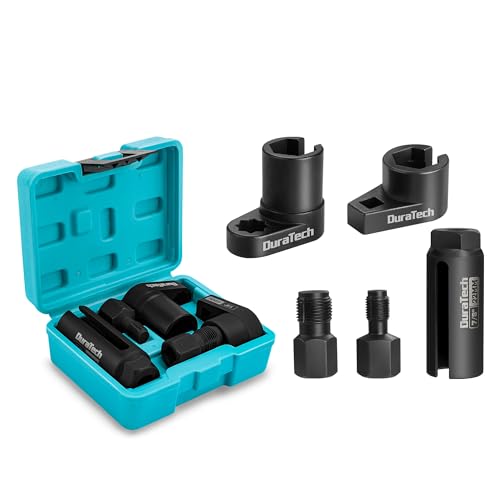 DURATECH b612d438-a26d-4bfb-828d-ce6346c97df9Best overall
 Rlokciy 5pcsBest CR-V set
 A ABIGAIL A7841FBest low-profile access
Start with the right socket
Oxygen sensors sit in the exhaust, and years of heat cycles can seize them in their threads. The sensor also has a wire permanently attached, so a standard deep socket will not slide over it. An O2 sensor socket has a slot that lets the wire pass through, which means you can leave the wiring in place while you turn the sensor.
Most sensors take a 22mm hex, which is the same as 7/8 in. If you are shopping, our best oxygen sensor removal tool page lines up several sets on one spec sheet so you can compare socket styles, drive sizes and extras side by side.
Drive size matters more than people expect. A 1/2 in drive accepts a breaker bar, which gives you the leverage a stubborn sensor needs. A 3/8 in drive fits into tighter spaces but gives you less leverage.
Is it easier to remove an O2 sensor hot or cold?
Slightly warm is the sweet spot. Run the engine for a couple of minutes, then shut it off. Metal expands when it warms, and the exhaust bung and the sensor expand at different rates, which can break the grip of rust and carbon in the threads. A sensor that has been sitting cold for days is often at its most stubborn.
Do not go to the other extreme. A fully hot exhaust can cause serious burns, and the manifold and pipes stay hot far longer than you would guess. If you can hold your hand near the area without pulling away, it is not too hot. If in doubt, wait.
A fully cold engine is the safest for your skin, and it can work fine on a sensor that has not been in place for long. If it refuses to move cold, a short warm-up is the easiest fix before you try anything more aggressive.
Step-by-step removal
Here is the basic process for a sensor that is not badly seized.
- Park on level ground, set the parking brake and let the engine cool until it is warm to the touch, not hot.
- If you need to get under the car, lift it with a jack and support it on jack stands. Never work under a car held up by a jack alone.
- Put on safety glasses. Rust and debris fall straight down when you work under a vehicle.
- Trace the wire back to its electrical connector and unplug it. Release the clip first and do not pull on the wires.
- Spray penetrating oil on the threads where the sensor meets the exhaust, and give it time to soak in.
- Slide the slotted socket over the sensor with the wire passing through the slot, and seat it fully on the hex.
- Turn counterclockwise with steady pressure. Use a breaker bar if a ratchet does not break it free.
- Once it moves, unscrew it the rest of the way by hand.
Match the tool to the space
Access is usually the hardest part of the job, not the torque. Sensors can sit behind the manifold or above a crossmember where a straight socket and ratchet will not fit. That is where offset and low-profile designs earn their place.
The table below summarizes the styles and where each one fits, based on the specs published for the sets we compare.
| Socket style | Best for | Drive notes |
|---|---|---|
| Deep slotted | Open access with room above the sensor | Pairs with a ratchet or breaker bar |
| Offset | Sensors with a nearby obstruction | Gives extra leverage in awkward spots |
| Crowfoot or low-profile | Very tight clearance | Often 3/8 in drive |
| 1/2 in drive offset | Seized sensors that need leverage | Takes a breaker bar |
What to do if it is seized
If the sensor will not budge, stop and reassess before you round the hex or snap something. First, add more penetrating oil, wait, and try again. A few rounds of oil, a warm-up and a firm steady pull solve many stuck sensors.
Direct heat on the bung is the fastest method for a truly seized sensor, but it brings real risks. Fuel lines, wiring and rubber parts can be close by, and gasoline vapors near an open flame are dangerous. If you use heat, move flammable materials away, keep a fire extinguisher within reach, and never heat anything near a leaking fuel line.
Use a socket made of strong steel. Steel quality affects how well a socket resists twisting under high torque. The sets we compare list materials such as chrome vanadium, chrome molybdenum and alloy steel, so check that detail if you expect a hard job.
If the hex starts to round off, stop. At that point a repair shop with the right equipment may be the safer choice than forcing it.
Clean the threads before the new sensor goes in
Do not skip this step. Old threads can hold carbon and rust that stop the new sensor from seating properly, and a dirty thread invites cross-threading. A thread chaser cleans and restores the threads in the exhaust bung without cutting new ones.
Many sets include chasers for common sensor thread sizes. For example, the DURATECH 5-piece set lists M12 x 1.25mm and M18 x 1.5mm chasers alongside three 22mm sensor sockets in 1/2 in and 3/8 in drives. Check your sensor's thread size before you pick a chaser.
Turn the chaser in by hand first and keep it straight. Then install the new sensor by hand until it seats, and snug it down with the socket to the torque your vehicle's manual lists. Many new sensors ship with anti-seize on the threads already, so read the instructions before adding any more. Keep anti-seize off the sensor tip.
Finally, reconnect the electrical plug, lower the vehicle and clear any stored codes as your vehicle requires.
Frequently asked questions
Can I remove an O2 sensor with a regular wrench?
Sometimes, if there is room for an open-end wrench on the hex. It works poorly on seized sensors, because open-end wrenches can slip and round the corners. A slotted socket grips all six sides.
Do I need to disconnect the battery first?
It is not usually required just to unscrew the sensor, but check your vehicle manual. Always unplug the sensor's connector before you turn it so the wire does not twist or tear.
Should I replace oxygen sensors in pairs?
Not necessarily. Replace the sensor that has a diagnosed fault. Your vehicle manual or a diagnostic code reader can help you tell which one it is.
Do I need hearing protection?
Rarely for this job, but eye protection is a must. If you use a hammer or air tools nearby, add hearing protection too.