How to Use an Oxygen Sensor Removal Tool Step by Step
Slide a slotted O2 sensor socket over the sensor with its wire passing through the gate, attach a ratchet or breaker bar, and turn counterclockwise with steady pressure. Work on a warm (not hot) engine with the electrical connector unplugged first, then clean the threads with a chaser before installing the new sensor. The steps are the same on Ford, Chevy, Toyota and Nissan vehicles. Only the sensor location and the available working space change.
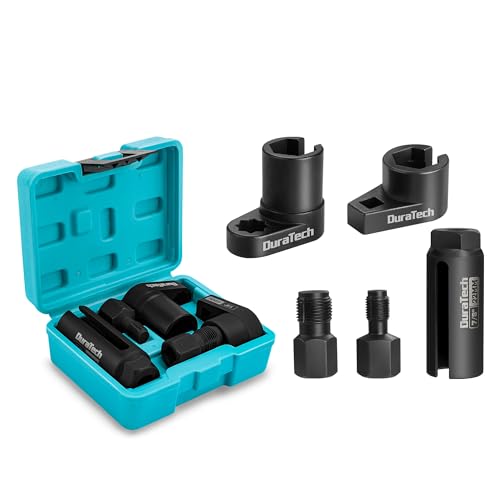 DURATECH b612d438-a26d-4bfb-828d-ce6346c97df9Best overall
 Rlokciy 5pcsBest CR-V set
 A ABIGAIL A7841FBest low-profile access
What the tool does and why a normal socket will not work
An oxygen sensor screws into the exhaust and has a wire coming straight out of its top. A regular deep socket cannot slide over that wire, and pulling the wire off would ruin a sensor you may want to keep for diagnosis. An O2 sensor socket has a slot (the wire gate) that lets the cable pass through while the socket grips the hex.
Most sensors use a 22mm, or 7/8 in, hex, and the sets we compare are built around that size. Many sets also include thread chasers, which are small taps that clean the threads in the exhaust bung so the new sensor goes in straight. If you are still deciding which set to buy, see our best oxygen sensor removal tool comparison.
Before you start
A few minutes of preparation prevents most of the trouble people run into with seized sensors. Exhaust parts hold heat for a long time, so patience here is also a safety step.
- Park on level ground, set the parking brake and let the engine cool until the exhaust is warm to the touch at most. A slightly warm exhaust makes the threads release more easily than a cold one, but a hot one will burn you.
- If you need to get under the vehicle, lift it with a jack and support it on jack stands. Never work under a vehicle held up by a jack alone.
- Wear safety glasses. Rust and grit fall straight down when you loosen exhaust parts.
- Find the sensor and trace its wire to the electrical connector. Unplug the connector and free the wire from any clips.
- Spray penetrating oil on the threads where the sensor meets the exhaust, and let it soak while you set up. Keep it away from hot parts and open flame.
Choose the right socket for the space you have
Sensor location decides which socket style works. Open access lets you use a long slotted socket. Tight spots behind the manifold or above a crossmember call for an offset or crowfoot style. The table below uses the published specs from sets on our comparison page.
| Set | Socket styles listed | Drive sizes | Chasers |
|---|---|---|---|
| DURATECH 5-piece | Two 22mm offset sockets (1/2 in and 3/8 in drive), one long 22mm socket | 1/2 in and 3/8 in | M12 x 1.25mm and M18 x 1.5mm |
| A ABIGAIL 5-piece | Extra deep socket (1.85 in), low-profile crowfoot (1.15 in), offset crowfoot (3.1 in) | 3/8 in | M12 x 1.25mm and M18 x 1.5mm |
| HTOMT 5-piece | Extra deep socket (3-1/8 in), low-profile crowfoot (1-1/4 in), 1/2 in drive offset crowfoot (1-15/16 in) | 3/8 in and 1/2 in | M12 x 1.25mm and M18 x 1.5mm |
Step-by-step removal
Once the sensor is unplugged and the oil has had time to work, the removal itself is quick. The key is a smooth, controlled pull rather than a sudden jerk.
- Thread the wire through the slot of the socket, then slide the socket down over the sensor hex until it sits fully on the flats.
- Attach your ratchet or breaker bar. A 1/2 in drive takes a breaker bar well, while a 3/8 in drive suits tighter spaces.
- Check that the socket is square on the hex. A socket that is tilted can round off the corners.
- Turn counterclockwise with slow, steady force. If it feels stuck, stop and apply more penetrating oil instead of increasing force.
- When the sensor breaks free, unscrew it by hand or with the ratchet and pull the wire through the gate.
- Inspect the old sensor tip and threads. Heavy deposits or damaged threads are worth noting before you install the new part.
Clean the threads and install the new sensor
Threads in the exhaust bung collect carbon and rust. A thread chaser cleans them out so the new sensor seats properly and does not cross-thread. The sets listed above include M18 x 1.5mm and M12 x 1.25mm chasers, so match the chaser to the thread size of your sensor.
Turn the chaser in by hand first, backing it out often to clear debris. Wipe the area clean before installing. Many replacement sensors arrive with anti-seize already on the threads. If yours does not, follow the sensor maker's instructions, and keep anti-seize off the sensor tip.
Thread the new sensor in by hand to avoid cross-threading, then snug it with the socket. Tighten to the torque value in your vehicle's service manual or the sensor's instructions, then reconnect the plug and secure the wire away from the exhaust.
Ford, Chevy, Toyota and Nissan notes
The tool and method do not change by brand. What changes is where the sensors sit and how much room you have. Engines with several sensors usually have one before the catalytic converter and one after it, so confirm which one you are replacing using your repair manual or the part number.
Trucks and SUVs from any maker often give you more room to use a long slotted socket. Compact cars with crowded engine bays more often need an offset or crowfoot style. Always check that your sensor really has a 22mm hex before you start, since not every application is the same.
If the sensor will not budge
Stubborn sensors are common after years of heat cycles. Try these steps in order, and stop if anything starts to round off.
- Add more penetrating oil and wait longer.
- Run the engine briefly to warm the exhaust, then let it cool until safe to touch before trying again.
- Switch to a longer breaker bar for steadier leverage rather than hitting the tool.
- Make sure the socket sits fully on the hex. A partly seated socket is the usual cause of rounding.
- If the hex is already damaged, a shop may have better options than forcing it.
Keep your tools in good shape
After the job, wipe the socket and chasers clean and store them dry. Listings for the sets we compare mention steel types such as chrome vanadium, chrome molybdenum and alloy steel, all intended to resist twisting under load. A storage case, where included, keeps the small chasers from getting lost.
Frequently asked questions
Can I remove an oxygen sensor with a wrench instead?
Sometimes, if there is room to fit an open-end wrench on the hex. The wrench grips only part of the flats, though, so a slotted socket is less likely to round the corners.
Do I need to disconnect the battery first?
It is not required for most sensor swaps, but check your vehicle's service manual. Always unplug the sensor connector before turning the sensor.
Should I replace both sensors at once?
Not always. Replace the one that is faulty, but if both are old, it can make sense to do them together while you have the tools out.
Will the check engine light go off right away?
Not always. The light may stay on until the system has run its checks, or until you clear the code with a scan tool.