How to Use a Stick Welding Machine as a Beginner
Clean the steel, clip the ground clamp to bare metal, pick a rod that matches your metal, and set the amps to the range printed on the rod box. Then strike the arc like a match, hold a short arc, and drag the rod along the joint at a steady pace. Stick welding is not hard to start, but it takes practice on scrap to get smooth, even beads.
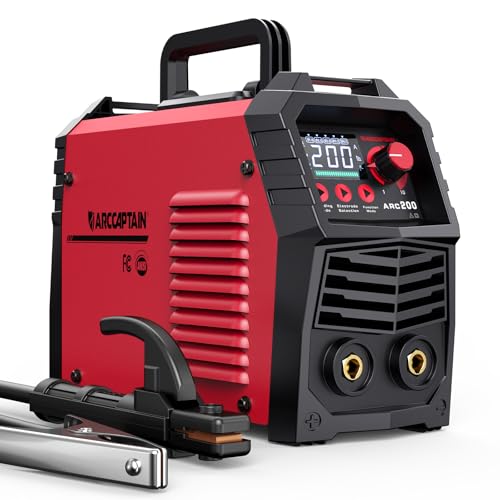 ARCCAPTAIN ARC200Best overall
 YESWELDER ARC-205DS PROBest for power
 Eioehtl portable welderHighest rated output
What you need before you strike an arc
Stick welding (also called SMAW) melts a coated metal rod, called an electrode, to join steel. The coating makes its own shielding gas, which is why stick welders work outdoors and on rusty or painted steel without a gas bottle.
Gather the basics first. Having everything within reach keeps you from fumbling with a hot rod in your hand.
- A stick welder with an electrode holder and ground clamp
- Rods that suit your steel (6011, 6013 and 7018 are common choices for beginners)
- An auto-darkening welding helmet, welding gloves and a flame-resistant jacket or long sleeves
- Safety glasses to wear under the helmet, plus closed leather boots
- A wire brush and chipping hammer to clean the slag
- Scrap steel to practice on, and a fire extinguisher nearby
Set up the machine and your workspace
Start with the work area. Clear away anything that can burn, such as rags, paper and solvents, and keep a dry floor under you. Welding sparks can travel several feet, so check for flammables below and behind you too.
Prepare the metal next. Grind or brush off loose rust, paint, oil and mill scale where the ground clamp and the weld will go. Stick tolerates dirt better than other processes, but a clean surface still gives a steadier arc.
Connect the ground clamp to bare metal on your workpiece or the welding table, close to the joint. A weak ground is a common reason for a sputtering arc. Then insert a rod into the electrode holder so the bare end is gripped firmly.
Check the power before you switch on. Many modern inverter machines run on both 120V and 240V, and 240V is better when you want to burn larger rods. Plug directly into a proper outlet when you can. If you must use an extension cord, use a heavy-duty one that suits the machine's input current. Some machines ask you to wait until the fan stops before powering on, so read the manual for your model.
Choose the rod and set the amps
Rod diameter and amperage go together. Thicker steel and larger rods need more amps, and every box of rods prints a recommended range. Start in the middle of that range and adjust from there. Too cold and the rod sticks. Too hot and you get a wide, flat bead with spatter or burn-through on thin metal.
Machine specs matter here. One welder on our comparison page lists a rod range of 0.063 to 0.197 inches, while another lists 0.094 to 0.125 inches. A wider range gives you more room to grow. You can see more of these numbers on our best stick welding machine page.
| Rod type | Typical use | Beginner notes |
|---|---|---|
| E6013 | Clean mild steel, light fabrication | Soft, easy arc and simple slag removal |
| E6011 | Rusty, dirty or painted steel, outdoor repairs | Works on AC and DC and digs into dirty metal |
| E7018 | Structural work and thicker steel | Smooth, strong welds, but the rod must stay dry |
| E6010 | Deep penetration on dirty steel | Needs DC and a more skilled hand |
Strike the arc and run your first bead
Put on your helmet, gloves and jacket before you switch the machine on. Never look at an arc without a proper welding lens. The light can injure your eyes in seconds, and bystanders need protection too.
There are two ways to start an arc. Try the scratch method first, which feels like striking a match. Drag the rod tip across the metal, then lift it slightly. Or try the tap method, where you tap the rod down and pull up. Either way, lift only about the thickness of the rod's core wire. Pulling too far kills the arc.
- Hold the rod at about 10 to 15 degrees past straight up, pointing along the direction you will travel.
- Strike the arc and pause briefly to form a molten puddle.
- Keep the arc length about equal to the rod's core wire diameter. As the rod burns shorter, feed it toward the work.
- Move steadily along the joint, watching the puddle and not the arc itself.
- At the end, pause for a moment to fill the crater, then lift away.
- Let the weld cool, then chip off the slag and brush the bead to inspect it.
Technique: angle, speed and arc length
Three things shape a stick bead: travel angle, travel speed and arc length. A drag angle of 10 to 15 degrees pushes the slag behind the puddle. If you tilt the rod too far, slag can run ahead and get trapped in the weld.
Speed is the next lesson. Move too fast and the bead looks thin and ropey. Move too slow and it piles up wide and heavy. Aim for a bead about two to three times as wide as the rod core, with evenly spaced ripples that look like tight rows of fish scales.
For arc length, shorter is almost always better. A long arc makes a loud, crackling sound and a spattery bead. A short, tight arc has a steady hiss, similar to frying bacon. Practice running straight lines on flat scrap before you try joints.
Weld in a small, comfortable position. Rest your elbows or forearms on the table, keep your body relaxed, and use both hands on the holder if that steadies you. Take breaks, because hot slag and fumes build up fast in a closed space. Weld with good ventilation and keep your head out of the smoke plume.
Fix common beginner problems
Most early problems have simple causes. Use this list to diagnose what you see before you change several settings at once.
- Rod keeps sticking: raise the amps slightly, strike more briskly, and pull away sooner. An anti-stick feature on the machine can help.
- Arc is hard to start: clean the ground contact and check the rod coating for damage. Hot start boosts current for an instant at ignition to help.
- Lots of spatter: shorten the arc or lower the amps.
- Holes in thin metal: lower the amps, use a smaller rod and move a little faster.
- Porous, pitted welds: damp rods are a common cause, especially with 7018. Store them dry as the maker advises.
- Slag stuck in the weld: slow down slightly, clean between passes and keep the right drag angle.
Features that make learning easier
A few machine features can make life easier while you build skills. Hot start gives the arc an extra push to light, arc force adds current when the arc gets very short, and anti-stick cuts power if the rod freezes to the work. The ARCCAPTAIN ARC200, YESWELDER ARC-205DS PRO, Eioehtl 250A and Sefaspe ARC 200Pro on our comparison page all list these three helpers.
A digital display is another useful aid. It lets you check and change settings without guessing. Some machines also match settings to the rod size you select.
If you expect to weld outdoors or on thicker steel as you improve, compare maximum amps against your rod sizes and the duty cycle, which is how long the machine can run before it needs to cool. The highest duty cycle listed on our page is 60%. For a full side-by-side look, see our stick welder comparison.
Frequently asked questions
Is stick welding hard for beginners?
It has a learning curve, mainly in keeping a short arc and a steady pace while the rod shortens. With scrap metal practice and a forgiving rod like 6013, most beginners can lay usable beads within a few sessions.
Can I stick weld with a regular household outlet?
Many inverter welders run on 120V, though they give less output than on 240V. Check the manual for the minimum breaker size, and avoid sharing the circuit with other heavy loads.
Should I use AC or DC for stick welding?
Most small inverter welders supply DC, which gives a smoother arc and works with common rods. AC suits some rods, such as 6011 and 6013, but it is not needed for learning.
How do I store welding rods?
Keep them in their original box in a dry place. Low-hydrogen rods like 7018 need extra care, so follow the rod maker's storage advice.
Do I need special clothing to stick weld?
Yes. Wear a welding helmet, leather gloves, flame-resistant clothing covering your arms and legs, and closed leather boots. Avoid synthetic fabrics that melt and shorts or open shoes.