How to Use a Sliding Compound Miter Saw Safely
Clamp the workpiece flat against the fence, set your angles, let the blade reach full speed, then pull the saw head toward you, lower it into the wood, and push it back through the cut. Keep both hands well clear of the blade path, wear eye and hearing protection, and let the blade stop before lifting it. Most accidents come from rushing, loose workpieces, and hands too close to the blade.
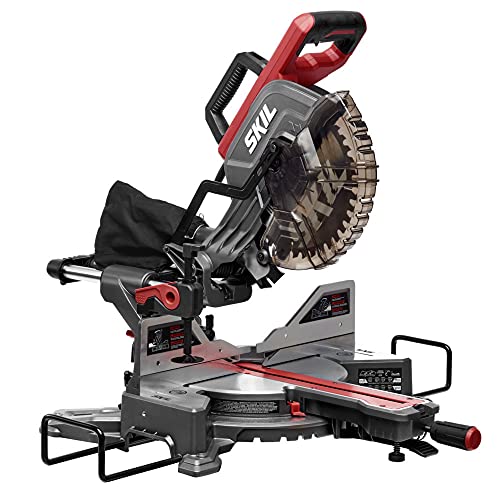 Skil MS6305-00Best overall
 DEWALT DEWALTCordless with 14 in cut
 DEWALT DCS361B
Start With the Right Setup
A safe cut begins before you touch the trigger. Place the saw on a stable, level surface at a comfortable height, and leave clear space on both sides for long boards. A wobbling saw or a board that sags off the table can pinch the blade and cause kickback.
A sturdy stand or workbench with side supports makes a real difference, because it holds long stock level with the table. If you are shopping for one, our best miter saw stand comparison lines up the options side by side.
Before every session, unplug the saw and look it over. Check that the blade is sharp, clean, and tightened properly, that the blade guard moves freely and returns on its own, and that the fence and table insert are in good shape. Never remove or tape back the guard.
Electrical safety counts too. Keep the cord clear of the blade path, use an extension cord rated for the saw, and do not run the saw on damp ground or in wet conditions.
Gear and Clothing to Wear
A miter saw is loud and throws chips and dust. Dress for it, and keep your appearance simple so nothing can catch on the spinning blade.
- Safety glasses or a face shield rated for impact.
- Hearing protection, such as earmuffs or earplugs.
- A dust mask or respirator when cutting for more than a few minutes, especially with treated lumber or MDF.
- Snug sleeves, no dangling cords, no jewelry, and tied-back long hair.
- Closed-toe shoes with good grip.
- No gloves near the blade, since they can catch and pull your hand in.
Know Your Saw's Controls
A sliding compound miter saw can do three things. The miter angle swings the blade left or right. The bevel angle tilts the blade. The slide lets the head travel on rails so it can cut wider boards than a fixed saw could.
Learn where the miter lock, bevel lock, depth stop, and slide lock are before you cut. Many saws have a lock that keeps the head from sliding when you move or store the saw. Release it only when you are ready to cut, and relock it afterward.
If you are picking a model, our best 12 sliding compound miter saw guide covers the popular 12 inch class, and the best miter saw for beginners list focuses on models that are easier to learn on.
The Safe Cutting Sequence
Follow the same steps every time. A routine keeps your hands and attention in the right place.
On the question of pushing or pulling: with a sliding saw, the standard technique is to pull the head toward you first, lower the spinning blade into the top of the board, then push it away from you through the cut. Pushing through the wood keeps the blade from climbing up and grabbing the board, which can happen if you pull the blade toward you while it is cutting.
- Unplug the saw and set the miter and bevel angles, then lock both.
- Place the board flat on the table and snug against the fence.
- Clamp it down, or hold it by hand only if your hand stays well outside the blade path. Your saw's manual states a minimum distance, so check it.
- Line up the cut with the blade, using a pencil line and a dry run with the saw unplugged.
- Plug in, stand slightly to one side of the blade line, and squeeze the trigger.
- Wait for full blade speed, pull the head out, lower it, and push through the cut in one smooth motion.
- Release the trigger and keep the head down until the blade stops completely.
- Raise the head, then remove the pieces.
Handling Material and Cut-Offs
Never cut a board that is not flat or stable on the table. Warped or round stock can roll or twist. Use clamps, and add support at table height for long pieces.
Do not reach across the blade, and never clear off-cuts while the blade is spinning. Use a stick to nudge small pieces away after the blade has stopped. Cutting very short pieces by hand is risky, so clamp them or use a stop block.
Dust control also matters for your lungs and your visibility. If that is a priority, see our best miter saw for dust collection comparison. Woodworkers who care about clean joints may also like the best miter saw for woodworking page.
Quick Troubleshooting Reference
If something feels off, stop, release the trigger, and unplug the saw before you investigate.
Here are common problems and the usual fixes.
| Problem | Likely cause | What to do |
|---|---|---|
| Rough or burned cut | Dull or dirty blade | Clean or replace the blade |
| Board shifts during cut | Not clamped or held firmly | Clamp it and support the free end |
| Blade grabs or jerks | Dragging the blade toward you mid-cut or forcing it | Push slowly and steadily through the cut |
| Angles are off | Loose locks or misaligned fence | Recheck locks and calibrate the saw |
| Saw wobbles | Uneven surface or loose stand | Level and secure the base |
Frequently asked questions
Can I use a miter saw for ripping boards lengthwise?
No. A miter saw is made for crosscuts and angled cuts. Ripping along the grain can bind the blade and cause kickback. Use a table saw or circular saw with a guide instead.
Why should I never cross my arms while cutting?
Crossing one arm over the blade path puts it in danger if the board shifts or the blade grabs. Hold the stock with the hand on the same side of the blade, and keep both hands clear of the cut line.
How often should I check the blade?
Look at it before each use for chips, cracked teeth, or buildup. Replace or sharpen it when cuts get rough or the saw needs more force.
Is it safe to cut small pieces on a miter saw?
Only if you can secure them without placing fingers near the blade. Use clamps, a stop block, or cut them from a longer board rather than holding tiny pieces.