How to Use a Portable Air Compressor for Home Garage Work
Place the compressor on a level surface with room to breathe, connect the hose and tool with the regulator turned down, then plug it in and let the tank fill until the motor stops. Set the regulator to the pressure your tool or tire calls for, do the job, and drain the tank when you finish. Wear eye protection every time, and hearing protection if your unit is loud.
 Stealth SAQ-1234Best overall
 ECOMAX 0210673ABest ready-to-use kit
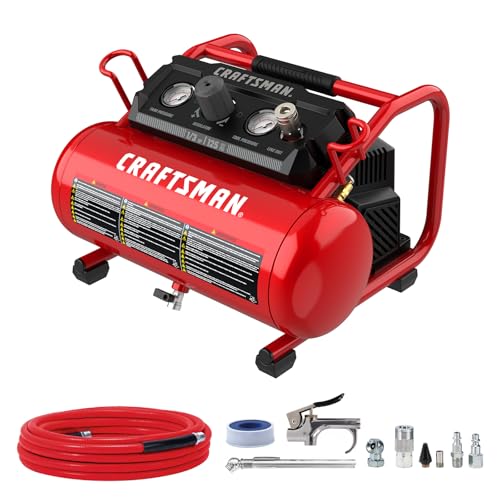 CRAFTSMAN CMXECXA0200244AEasiest to store
What you are setting up
A portable compressor has four parts you will touch every time: the pump and motor, the tank that stores air, the regulator that sets the working pressure, and the hose with its fittings. Most home units also have two gauges. One shows tank pressure and the other shows regulated pressure going to the tool.
The tank holds the air and the regulator controls how much pressure reaches the tool. Mixing those up is the most common first-time mistake. The tank can sit near its maximum, while the regulated side should match what your tool needs.
Look for the safety valve too. It is a small spring-loaded valve near the tank that releases pressure if something goes wrong. Never block it or tamper with it.
Pick a safe spot in the garage
Put the compressor on a flat, solid floor. A unit that rocks will vibrate more, and the rubber feet only work when all of them touch the ground. Keep it a few inches away from walls and stored boxes so the motor can get cool air.
Keep it away from gasoline cans, paint thinners, and the water heater or furnace if either runs on gas. Motors can spark, and garage vapors are flammable. If you spray finishes, work with good ventilation and keep the compressor well away from the spray area.
Use a properly rated outlet. Many compressors draw a lot of current when the motor starts, so avoid sharing a circuit with a space heater or a table saw. If you need an extension cord, use a short, heavy-gauge cord that your manual approves. A thin or long cord can overheat or starve the motor.
First-time setup, step by step
Read the manual's startup section before the first run. Some models want a short break-in period, and the manual will say so. Then follow this order:
- Make sure the compressor is unplugged and the power switch is off.
- Turn the regulator knob all the way down (counterclockwise) so no pressure goes to the hose yet.
- Wrap thread seal tape around any threaded fitting that does not already have sealant, then tighten the hose coupler or plug by hand and snug it with a wrench.
- Connect the hose to the outlet, and attach your tool, tire chuck, or blow gun to the other end.
- Close the drain valve at the bottom of the tank. It usually turns by hand.
- Plug in the compressor and switch it on. The motor will run until the tank reaches its cutoff pressure and then stop.
- Slowly turn the regulator up until the regulated gauge shows the pressure you need.
Match the pressure to the job
More pressure is not better. A tool that gets too much can be damaged, and a tire filled past its rating is a hazard. Always follow the pressure printed on the tool, the tire sidewall, or the sticker inside the driver door jamb.
The table below shows how different garage tasks tend to use air. Treat the pressure column as a starting point and check your own tool's manual before you begin.
| Job | Air demand | Typical approach |
|---|---|---|
| Car and bike tires | Low | Use a clip-on chuck and a gauge. Set to the pressure on the door jamb sticker. |
| Blow gun for dust | Low | Short bursts at modest pressure. Never aim at skin. |
| Brad nailer or stapler | Low | Set the regulator to the range in the tool manual, then test on scrap wood. |
| Inflating pool toys, balls | Low | Use a low regulator setting and watch the gauge closely. |
| Spray gun | Moderate to high | Needs steady airflow. Check the gun's requirement first. |
| Ratchet or impact wrench | High | Needs steady airflow, and a small tank will cycle often. |
Using it for everyday jobs
For tires, connect the chuck to the valve stem, press it on firmly, and watch the gauge. Add air in short bursts and check often. It is easier to add a little more than to let air out. Check tire pressure when the tires are cold.
For nailers, connect the hose, set the regulator, and fire a few test nails into scrap before touching your project. Wear safety glasses, and never point the tool at yourself or anyone else. Disconnect the air before clearing a jam.
For a blow gun, keep the pressure modest and wear eye protection. Compressed air can drive dust and chips into your eyes at speed and can injure skin. Never use it to clean clothing while you are wearing it.
Your fittings matter more than most people expect. A leaky coupler wastes air and makes the motor run more often. If you are choosing connectors, see our guide to the best air compressor fittings to compare common types.
Shut down and maintain it
Finishing correctly keeps the tank from rusting and keeps the compressor safe to store. Moisture condenses inside the tank every time it runs, so draining is not optional, even for oil-free models.
Shutdown order:
- Turn the regulator down and switch the compressor off.
- Unplug it.
- Release the hose pressure by triggering the tool or blow gun, then disconnect the hose.
- Open the drain valve and let the water and air out of the tank. Stand to the side, since the air comes out with force.
- Leave the valve open while stored if your manual says so, and wipe down the unit.
Choose a compressor that fits your garage
If you are still shopping, size the machine to your jobs. Tire inflation and a brad nailer need little air, while spray guns and impact tools need more. Our best portable air compressor for home garage page compares many models, and the best air compressor for home garage page covers the wider category.
Here are a few models from our comparison, using the published specifications:
| Model | Tank | Max PSI | Airflow at 90 PSI | Weight |
|---|---|---|---|---|
| Stealth 2 Gallon (hot dog, 60 dB) | 2 gal | 125 | 1.8 SCFM | 41.89 lb |
| California Air Tools 8010A (60 dB, wheel kit) | 8 gal | 120 | 2.2 SCFM | 37.25 lb |
| Klutch 20-Gallon (wheeled) | 20 gal | 175 | 4.2 SCFM | 90 lb |
| ECOMAX 6 Gal Pancake (25 ft hose) | 6 gal | 150 | Not listed | 34.17 lb |
| Ironton 3 Gal Pancake | 3 gal | 110 | Not listed | 20.6 lb |
Quick troubleshooting
If the compressor runs constantly or the pressure will not build, listen for a hiss. A loose coupler or a leaking hose is the usual cause. Brush soapy water on the joints and look for bubbles.
If the motor will not start, check the outlet and the cord first. Many units have thermal overload protection, so let it cool and try again. If the breaker trips repeatedly, stop and have the circuit checked rather than forcing it.
For larger jobs, you may want a bigger setup. Our best air compressor for home shop page is a good next step.
Frequently asked questions
Can I leave air in the tank between uses?
It is safe to leave pressure in the tank for short breaks, but drain it fully after each work session so moisture does not rust the tank.
Do oil-free compressors need any upkeep?
They skip oil changes, but you still need to drain the tank, check hoses and fittings for leaks, and keep the air intake clean.
Why does my compressor keep restarting?
A small tank refills quickly under steady use, and a leak makes it cycle even when you are idle. Check the fittings for leaks first.
Do I need hearing protection in my garage?
Quieter models are easier to live with, but earmuffs or plugs are a good idea for long sessions, especially in a small closed space.