How to Use a Paint Edger Properly
Load the pad lightly, keep it flat against the surface, and glide it along the edge in one slow, steady pass. Let the guide wheels or the pad edge do the steering, and don't press hard. On a ceiling, a threaded extension pole lets you do the same motion from the floor.
 Voomey 7 pc paint edgerBest overall
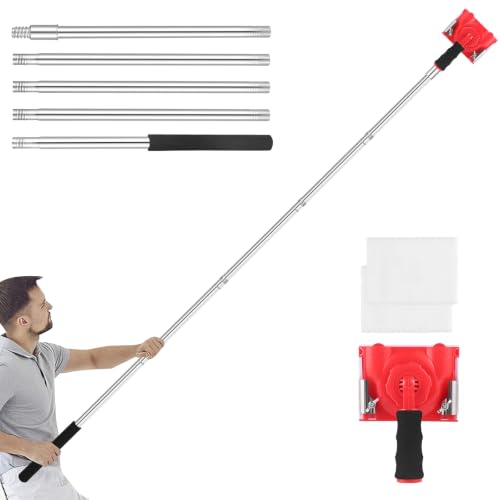 Woxnoc paint edger tool for walls-12APole included for ceilings
 Dekonmon XB7Most pieces in the kit
Get the room and the tool ready
Most of a clean edge comes from prep. Wipe dust and cobwebs off the line where wall meets ceiling or trim, because a pad drags grit straight into wet paint. If the surface is greasy, such as near a kitchen stove, clean it first so paint sticks evenly.
Check your edger before you load it. The pad should be seated firmly, and the handle should be tight if it rotates. Many edgers have a 360 degree rotating handle, which lets you change the angle of the pad without twisting your wrist. Lock it in place before you start so it doesn't swing mid-stroke.
Cover the floor and furniture anyway. An edger reduces drips, but a loaded pad can still shed a spot or two when you move it.
- Dust the edge line and wipe off grease.
- Stir the paint well and pour a small amount into the tray.
- Confirm the pad is seated and the handle is locked.
- Keep a damp rag nearby for quick wipes.
- Put on safety glasses if you will paint overhead.
Load the pad the right way
Too much paint is the most common cause of bleed. Dip only the face of the pad, or slide it across the raised ridges of a tray, so paint spreads evenly. Tray kits are built for this: the Voomey 7-piece kit lists a 9 in pad and a tray, and the Dekonmon 15-piece kit lists a 7 in pad with its own compact tray.
Press the loaded pad against the tray's scraper edge or ridges once or twice to remove excess. The pad should look evenly coated, not dripping. You want enough paint to cover about an arm's length of edge, then reload.
If you use a wheel-guided model, keep the wheels clean. Paint on a guide wheel will smear onto the surface it rides against, which is exactly what you are trying to avoid. Wipe the wheels every few reloads.
Edge along a ceiling step by step
Work in sections, and keep the motion smooth. Stopping and starting leaves thick spots at the end of each stroke. Follow these steps for a ceiling line.
- Start at a corner and set the pad flat where wall meets ceiling.
- Press lightly so the pad touches the wall and the guide, if any, rides on the ceiling.
- Pull the edger along the line at a slow, even pace.
- Keep the pad angle the same for the whole stroke. Tilting it pushes paint under the guide.
- Lift away at the end of the run instead of dragging off sideways.
- Reload, overlap the last bit of wet paint slightly, and continue.
- Wipe the pad edge or guide wheel if you see paint building up.
| Guide style | How it helps | What to watch |
|---|---|---|
| Wheel-guided | Wheels ride the ceiling or trim and steady the pad on long straight runs | Wipe the wheels often so they don't smear paint |
| Pad-only | More freedom around curves and varied shapes | Needs a steadier hand and a consistent angle |
Using a paint edger on a pole
An extension pole saves ladder trips on ceiling edges. Many edgers have a standard threaded socket that screws onto a threaded pole. Check the listing for pole compatibility, since some kits don't say. Several kits, such as the Voomey and Dekonmon sets, are listed as pole compatible but do not include a pole. Woxnoc ships with one and lists a maximum reach of 78.7 in.
To mount it, thread the handle onto the pole and tighten any knob so the head does not spin. Hold the pole with both hands, one near the end and one about waist height. This gives you leverage and lets you steer the pad with your body instead of just your wrists.
Walk the line rather than stretching. Take a few steps, keep your elbows relaxed, and move at the same pace you would by hand. If the pad wobbles, shorten your grip on the pole. For longer reach, see which kits list the highest numbers on our best paint edger comparison.
Safety note: if you still need a ladder for any section, set it on a firm, level floor and keep your belt buckle between the rails. Never lean out to stretch a line. Poles can also touch light fixtures and ceiling fans, so turn fans off and take care around anything fragile.
Handle corners, trim and windows
Straight edgers do well on long runs but struggle in tight corners. A corner pad or a small detail pad covers what the main pad can't reach. Kits such as the Voomey set list a corner pad and a 1 in mini trim pad, so you can switch tools instead of forcing the large pad into a corner.
For window frames and door trim, use the smaller pad, or a narrower edger. Pad width on our comparison page ranges from 4.7 in to 9 in. A narrower pad gives you more control near corners, while a wider one covers more edge per pass. If your room has lots of trim, our paint edger comparison shows which kits include corner and detail pads.
Brush the last inch into corners by hand if needed. It is quicker than fighting the tool, and it keeps the line clean.
Fix common problems
Most edging issues come from a few habits. Use this table to spot the cause quickly.
| Problem | Likely cause | Fix |
|---|---|---|
| Paint bleeds onto the ceiling | Pad too wet or pressed too hard | Offload excess and use lighter pressure |
| Wavy line | Moving too fast or changing pad angle | Slow down and keep the angle steady |
| Thick spots at stroke ends | Stopping and starting mid-line | Lift away smoothly and overlap slightly |
| Smears from the guide | Paint on the wheel or guide edge | Wipe it clean every few reloads |
| Pad leaves fuzz or streaks | Worn or dirty pad | Swap to a replacement pad |
Clean up and stay safe
Clean the pad soon after you finish. For water-based paint, rinse it with warm water until it runs clear, squeeze out the water, and let it dry flat. If you used oil-based paint, follow the paint maker's cleanup instructions. Spare pads help on bigger jobs, so you can swap in a clean one instead of stopping to wash.
Ventilate the room while you paint and while the paint dries. Open windows and wear a mask if the label advises it. Wear glasses when painting overhead, since drips fall straight toward your face. Gloves keep paint off your skin. Never pour leftover paint down a drain, and check local rules for disposal.
Frequently asked questions
Can I use a paint edger without taping?
Often yes, on smooth surfaces. A light load and slow, steady passes keep paint from creeping, but textured walls can still let paint seep, so tape may help there.
Should I edge before or after rolling?
Edge first, then roll the main wall while the edge is still slightly wet. This blends the two areas and avoids a visible band around the border.
How often should I reload the pad?
Reload when the line starts to look thin or dry, usually after an arm's length or so of edge. Loading before the pad runs dry gives a more even finish.
Do I need a different pad for trim?
A smaller pad usually works better on trim and window frames. A narrow detail pad or corner pad gives you more control than a wide wall pad.