How to Use a Multimeter to Check Voltage on a Car
Set your multimeter to DC volts (the straight line symbol), touch the red probe to the battery's positive terminal and the black probe to the negative terminal, and read the display. A healthy, rested 12-volt car battery reads about 12.6 volts, and a running engine should show roughly 13.7 to 14.7 volts at the battery. The same steps work on any other circuit, as long as you stay in the voltage setting.
 allsun EM133AWidest RPM range
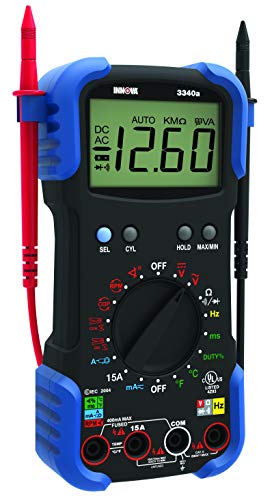 Innova 3340Lightest and simplest
 GEARWRENCH GWDM107_1Highest safety rating
What You Need Before You Start
Any digital multimeter that measures DC voltage can check a car battery. The one thing to confirm is the range. Car systems run on 12 volts, so you want a DC setting that tops out above that, usually the 20V DC range on a manual-ranging meter.
Auto-ranging meters pick the range for you, which is easier if you are new to this. If you are shopping, our best multimeter for automotive comparison lists models with extras like RPM and dwell angle, though none of those are needed for a basic voltage check.
Gather these items first:
- A digital multimeter with fresh batteries
- Test leads in good shape, with no cracked insulation
- Safety glasses and, if you like, thin gloves
- A clean rag or wire brush for dirty battery terminals
- A flashlight if the battery is in a dark spot
Set Up the Meter
Plug the black lead into the COM jack. Plug the red lead into the jack marked for volts, often labeled V with the ohm symbol. Do not use the amp jack for voltage. Many meters have a separate 10A or 20A jack, and putting the leads there while measuring voltage can blow a fuse or damage the meter.
Turn the dial to DC volts. The symbol is a V with a straight line, sometimes a solid line over a dashed one. Do not choose the wavy line, which is for AC. If your meter is manual-ranging, pick the 20V setting.
Check that the meter is working before you trust it. Touch the probe tips together while in a resistance or continuity mode, or simply confirm the display lights up and shows a steady zero in volts with the probes apart.
Check the Battery Voltage Step by Step
Start with the engine off and the key out. For the most honest number, let the car sit for a few hours first. A battery that was just driven or charged shows a surface voltage that reads higher than its real state.
- Open the hood and find the battery. Clean any corrosion off the terminals so the probes make solid contact.
- Touch the red probe to the positive terminal, marked with a plus sign or a red cover.
- Touch the black probe to the negative terminal, marked with a minus sign.
- Hold the probes steady and read the display.
- Write the number down, then remove the probes.
What the Battery Numbers Mean
These are common rules of thumb for a standard 12-volt lead-acid battery at rest. Exact figures vary a little by battery type and temperature, so treat them as a guide and not a verdict.
If the reading is low, charge the battery and test again before deciding it has failed. A deeply discharged battery sometimes recovers, while one that will not hold a charge needs replacing.
| Reading (engine off) | What it usually means |
|---|---|
| 12.6 V or higher | Fully charged and healthy |
| About 12.4 V | Roughly 75 percent charged |
| About 12.2 V | Roughly 50 percent charged, charge it |
| 12.0 V or lower | Discharged, charge it and retest |
| Below 10.5 V | Possible dead cell or failed battery |
Test the Charging System With the Engine Running
The battery is only half the story. The alternator should recharge it while you drive, and you can check that with the same setup. Leave the probes on the battery terminals, or clip them on if your leads allow it, then have a helper start the engine.
A good charging system usually shows about 13.7 to 14.7 volts at idle. If you see something close to the resting battery voltage, the alternator may not be charging. If the number climbs well above 15 volts, the voltage regulator could be failing, which can cook a battery.
Next, turn on the headlights, the blower fan and the rear defroster, and raise the engine speed a little. The voltage should stay steady. A big drop under load points to a weak alternator or a loose belt.
You can also watch the voltage while the engine cranks. Most healthy batteries stay above about 9.6 volts during a start. A much lower number suggests the battery is tired or the starter is drawing too much current.
Checking Voltage on Other Circuits
The same method works on fuses, relays, lights and connectors. Keep the black probe on a clean bare metal ground, such as the negative terminal or an unpainted bolt on the engine block. Touch the red probe to the wire or terminal you want to check.
A fuse test is a good example. With the circuit on, touch the probes to the two small metal test points on top of a blade fuse. A reading near zero means the fuse is good and passing current. A reading near battery voltage means the fuse is blown.
For a voltage drop test, measure across a cable or connection while the circuit is running. Ideally you see only a few tenths of a volt. A higher drop means corrosion or a bad connection is stealing power.
Modern cars have sensitive control modules. A meter with 10 MegOhm input impedance, like the Innova 3340 on our comparison page, draws very little current from the circuit, so it will not upset the electronics. Most current digital meters meet this standard.
Safety Notes
A 12-volt battery will not shock you through dry skin, but it can deliver a lot of current. A dropped wrench across the terminals can weld metal, burn skin and ignite battery gas. Take off rings and watches before working near the battery.
Wear safety glasses, since batteries can vent hydrogen and contain acid. Keep sparks and flames away. Never lean over the battery while connecting or disconnecting anything.
With the engine running, keep your hands, leads and loose clothing clear of the belts and the cooling fan. Route the leads so they cannot drift into moving parts or touch a hot exhaust manifold.
Ignition systems, especially on older cars and hybrids or electric vehicles, can carry much higher voltages. Hybrid and electric high-voltage systems are not a DIY multimeter job. Leave the orange cables alone and follow the manufacturer's service procedures.
If you want extra safety margin for general electrical work, look at the CAT rating. The GEARWRENCH GWDM107 carries a CAT IV rating, while the FROGBRO 20000 count analyzer and the allsun EM133A are rated CAT III. You can compare the rest in our automotive multimeter list.
Common Mistakes to Avoid
Most bad readings come from a few simple errors:
- Leaving the leads in the amp jack while measuring voltage
- Measuring on the AC setting instead of DC
- Testing right after driving, which gives a falsely high battery reading
- Poor contact on a corroded terminal or painted ground
- Reversing the probes, which just shows a minus sign on most digital meters and is harmless for voltage
Frequently asked questions
Does it matter which probe goes on which terminal?
For a digital meter measuring voltage, a swapped connection just shows a negative sign. It will not hurt the meter or the car, but red to positive and black to negative is the habit to keep.
Can I test the battery while it is still connected?
Yes. For a voltage check you leave the battery connected and just touch the probes to the terminals or the clamps. You only disconnect it for other jobs, like a parasitic draw test.
Why does my reading change when I turn on the lights?
Electrical loads pull current and pull the voltage down a little. A small dip is normal. A large drop with the engine off suggests a weak battery, and a large drop with the engine running points to the charging system.
Do I need an automotive multimeter just to check voltage?
No. A basic digital meter does this job. Automotive models add functions such as RPM, dwell angle and duty cycle, which matter for ignition and injector diagnosis rather than simple voltage checks.