How to Use a Hammer Safely: Common Mistakes to Avoid
Wear safety glasses, check the handle and head before every job, and strike the nail squarely with the flat face while holding the handle near the end. Most hammer injuries come from a few avoidable habits: a damaged tool, a poor grip, off-center blows and no eye protection. Match the hammer to the job and keep your swing controlled.
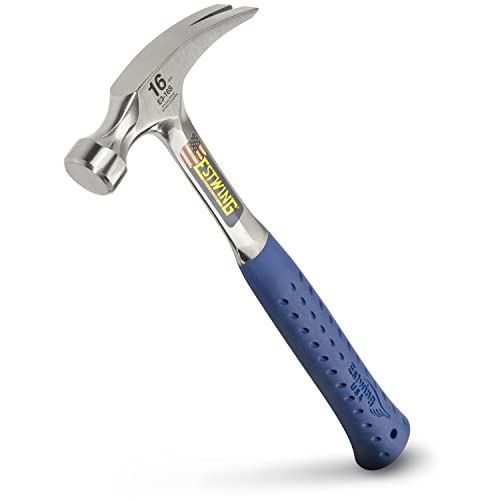 Estwing E3-16SBest overall
 Jorgensen 60102Magnetic starter, 20 oz head
 Estwing E3-16CCurved claw for prying
Start with the right hammer for the job
Safe hammering starts before the first swing. A hammer that is too heavy tires your arm, and a tired arm misses the nail. A hammer that is too light makes you swing harder to get the same result. Either one raises the odds of a glancing blow or a bent nail.
Head weight is the first thing to match to your work. On our best hammer comparison, head weights run from 16 oz to 24 oz. A 16 oz head suits general repairs and trim. Heads of 20 oz and up add driving power for framing, but they take more effort over a long day.
Use a hammer only for what it is made for. A claw hammer drives and pulls nails. It is not a tool for striking hardened steel, other hammers or masonry chisels. If the job needs a different striking tool, switch tools instead of forcing the one in your hand.
Inspect the hammer before you swing
Take ten seconds to look the tool over each time. A loose or damaged hammer can fail mid-swing, and a flying head is far more dangerous than a missed nail.
Run through this quick check:
- Handle: look for cracks, splinters, rough spots or sharp edges. Do not use a handle that is cracked, broken or loose in the head.
- Head: check that it is tight on the handle. Wobble, gaps or a rattle mean the tool needs to be replaced or repaired before use.
- Face: look for chips, mushrooming or deep dents. A damaged face can throw off fragments when it strikes.
- Grip: make sure it is clean and dry. Oil, sawdust or sweat can make the handle slip.
- Overall condition: if you are unsure, set the hammer aside and use another.
Protect your eyes, hands and hearing
Eye protection is the most important piece of gear for hammering. Nails can snap, bounce or fly off at an angle, and small fragments can leave a damaged hammer face or a hard surface. Wear safety glasses or goggles every time, even for a quick job.
Gloves can help with splinters and rough materials, but choose a snug pair that does not reduce your grip. Loose gloves can catch or slip on the handle.
Hearing protection matters for long sessions, especially when you are framing or working in a small, enclosed space where the noise bounces back. Ear protection is also a good idea if others are hammering nearby.
Keep your free hand safe. A magnetic nail starter lets you set a nail one-handed, and the Estwing Ultra Series 19oz Black Grip listing notes it helps avoid smashed thumbs. You can also hold a small nail with pliers or a piece of cardboard to keep your fingers clear.
Grip, stance and swing: how to hit the nail
Hold the handle near the end, not up by the head. Gripping too close to the head cuts your leverage and control, so you end up swinging harder for less result. Keep your wrist relaxed and let your elbow and shoulder do most of the work.
Stand with your feet apart and your body balanced. Keep the work at a comfortable height so you are not reaching or straining. If you must work overhead or on a ladder, set the ladder on firm, level ground, keep both feet on the rungs and never overreach. Falls are a bigger risk than the hammer itself at height.
Follow these steps for a clean strike:
- Set the nail with a few light taps so it stands on its own.
- Move your fingers away from the nail as soon as it holds.
- Keep your eyes on the nail head, not on the hammer.
- Swing so the face lands flat and square on the nail head.
- Finish with firmer blows once the nail is straight and seated.
Common mistakes and how to fix them
Most injuries trace back to a short list of habits. The table below pairs each one with a simple fix.
| Mistake | Why it is a problem | Better habit |
|---|---|---|
| Striking with the side of the head | Can chip the hammer and glance off the nail | Hit with the flat face, square to the nail |
| Skipping safety glasses | Flying nails and fragments can injure your eyes | Wear eye protection every time |
| Using a chipped or loose hammer | Parts can break away during a swing | Replace damaged tools |
| Gripping near the head | Less control and power | Hold near the end of the handle |
| Not checking your surroundings | Others can be hit by a swing or a dropped tool | Clear the area and watch your swing arc |
| Hammering on a poor surface | Nails bend and tools slip | Work on a firm, stable base |
Features that can make a hammer safer to use
The right features will not replace good habits, but they can reduce fatigue and slips. Our best hammer page lays out head weight, length, grip and claw type side by side, so you can match the tool to your work.
Shock reduction grips cut the sting of repeated strikes. Estwing says its molded grip reduces impact vibration by 70%, and the Jorgensen and Spec Ops listings describe shock-absorbing grips. Less vibration means less fatigue, and a fresher hand is a steadier hand. The CRAFTSMAN listing does not mention shock reduction.
Handle material also matters. One-piece forged steel hammers, such as the Estwing E3-16S, have no joint between handle and head that could loosen. The CRAFTSMAN fiberglass model lists overstrike protection where fiberglass handles are most prone to break.
Some features help with control. The Spec Ops 22 oz framing hammer lists compatibility with SRS retention lanyards, which is useful when you are working at height and do not want to drop a tool. A smooth face leaves fewer marks, while a milled face grips the nail head. A rip claw suits pulling nails and demolition, and a curved claw gives leverage for prying.
Pulling nails and prying safely
Pulling nails is where many people get hurt. Slide the claw under the nail head, then pull steadily instead of yanking. If the nail is long, slip a thin block of wood under the hammer head so you keep leverage and protect the surface.
Keep your face and hands out of the line of the handle. If a nail or board gives way suddenly, the handle can swing back toward you. Use a pry bar for heavy prying, since a hammer handle is not built for that kind of load.
When you finish, store the hammer in a toolbox, on a rack or on a belt loop. Do not leave it on a ladder step, a roof edge or the floor where someone can trip on it.
Frequently asked questions
Is it safe to use a hammer with a slightly loose head?
No. A loose head can fly off during a swing. Stop using the hammer until the head is secure, or replace it.
Do I need safety glasses for small jobs like hanging a picture?
Yes. A bent nail or a chip can fly in any direction, and it only takes one hit to injure an eye. Glasses take a few seconds to put on.
How can I avoid hitting my thumb?
Start nails with light taps, move your fingers back once the nail stands, and consider a magnetic nail starter or a pair of pliers to hold small nails.
Should I choke up on the handle for more control?
For fine finishing work, a slightly shorter grip can help. For general driving, hold near the end of the handle. A grip close to the head cuts power and control.