How to Use a Crimping Tool on Wire
Match the crimper's die or cavity to your terminal type and wire gauge. Strip the wire, seat the terminal in the correct slot, and squeeze the handle through a full ratchet cycle until it releases. Then tug the wire to confirm the crimp holds. Small JST-style connectors need a tool made for open barrel contacts and thin wire.
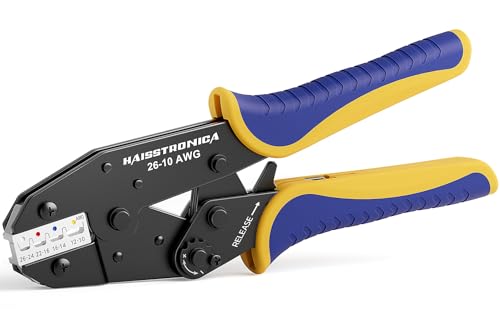 haisstronica HS-1073Best overall
 Plustool K-BM-104-USFull-featured heat shrink runner-up
 KLEIN TOOLS 3005CRColor-coded insulated terminal slots
Start With the Right Tool for the Terminal
A crimp works by squeezing a metal barrel tightly around stranded wire. The grip is mechanical, so the die shape and the size of the cavity matter more than raw squeezing force. A tool built for one terminal family will often do a poor job on another.
Our best crimping tool comparison puts connector type first for this reason. Heat shrink connectors, insulated terminals, ferrules and battery lugs each use different dies. The table below shows how a few tools on that page line up with different jobs.
| Terminal type | Example tool from our comparison | Listed wire range |
|---|---|---|
| Heat shrink connectors | haisstronica HS-1073 | 10 to 26 AWG |
| Insulated terminals (red, blue, yellow) | Klein Tools 3005CR | 10 to 22 AWG across three cavities |
| Mixed terminals with swappable dies | Vesmikit ratchet crimping set | 6 to 24 AWG, six dies |
| Open barrel terminals | Vesmikit die D | 20 to 10 AWG |
Check the Wire Gauge First
AWG numbers run backward. A lower number means thicker wire, so 10 AWG is much thicker than 22 AWG. Confirm that your wire gauge sits inside the range printed on both the tool and the terminal.
The Klein 3005CR is a good example of how cavities map to size. Its red cavity covers 22 to 16 AWG, the blue covers 16 to 14 AWG, and the yellow covers 12 to 10 AWG. Using the wrong cavity gives a loose crimp on thin wire or a crushed one on thick wire.
Prepare the Wire
Good prep prevents most failed crimps. Take a minute to get the wire and terminal ready before you touch the tool.
- Turn off power. For vehicle or boat work, disconnect the battery first.
- Cut the wire square with a cutter so the strands are even.
- Strip only as much insulation as the terminal barrel needs. The bare copper should reach the end of the barrel without poking out past it.
- Twist loose strands together with your fingers so none splay out.
- Inspect the terminal for cracks, bent barrels or corrosion, and discard any that look damaged.
Make the Crimp Step by Step
These steps suit most hand ratcheting crimpers, including heat shrink and insulated terminal types.
Wear safety glasses. Stray strands and small metal pieces can fly when you cut and crimp.
- Choose the die or cavity that matches the terminal and wire size.
- If your tool has an adjustment wheel or dial, set it for the terminal. Some tools on our page have adjustable force, and a test crimp on a spare terminal helps you dial it in.
- Slide the stripped wire fully into the terminal barrel.
- Place the terminal in the slot with the barrel centered in the die. For terminals with a seam, follow the tool's guidance on which side faces the indenter.
- Squeeze the handle slowly and steadily. A ratcheting tool clicks as it closes and will not open early.
- Keep squeezing until the handle releases on its own. This is the full-cycle release that gives every crimp the same force.
- Remove the terminal and look at the result.
Check the Crimp Before You Trust It
A good crimp looks even and compact, with the barrel squeezed firmly around the wire and no cracks in the metal. The insulation should not be cut or crushed. On heat shrink connectors, the tubing should stay intact.
Then give the wire a firm, steady tug. If the wire slides or the terminal twists off, cut it away and start again with a fresh terminal. Do not re-crimp an old one, because the metal has already been deformed.
Quick-release levers, like the one on the Plustool K-BM-104-US, open the jaws in any position. That helps if a terminal is placed wrong and you need to back out without finishing the cycle.
Crimping JST and Other Small Connectors
JST-style connectors use small open barrel contacts that are crimped onto thin wire, then pushed into a plastic housing. These contacts are much smaller than the heat shrink and insulated terminals most general-purpose crimpers are made for.
Check three things before you start. First, confirm the tool is made for open barrel terminals, not for insulated or heat shrink types. Second, make sure its listed range reaches the thin wire you are using. On our comparison page, the thinnest range any tool lists is 26 AWG, and small JST wiring is often finer than that, so read the fine print on the tool listing. Third, confirm the die size matches the contact size from the connector maker.
For open barrel contacts, the barrel usually has two sets of wings. One set grips the bare conductor and the other grips the insulation. A proper open barrel die forms both. After crimping, check that the contact still fits the housing and clicks into place. If the wings flare out, the contact may not seat.
Common Mistakes and Safety
Most problems come from a mismatch between the terminal, the die and the wire. Using a die that is too large leaves the wire loose, while one that is too small can cut strands.
Keep these points in mind:
- Do not use pliers or a flat jaw tool for crimping terminals, since they cannot form a consistent crimp.
- Strip the right length. Too little leaves copper out of the barrel, and too much exposes bare wire.
- Never crimp live wires. Treat any circuit as live until you have confirmed it is off.
- Keep fingers clear of the jaws and handle area when the tool closes.
- With heavy hydraulic tools used on battery cable, such as the Brileine at 5.95 lb, support the weight and keep hands away from the die area.
- Take breaks during repeated crimping. A cushioned or non-slip grip can ease hand fatigue.
Frequently asked questions
Can one crimper handle every terminal?
Not usually. Each crimper is built around specific dies. Swappable die sets cover more terminal types, but you still need to pick the correct die for each one.
Why will my ratcheting crimper not open halfway?
The ratchet is designed to hold until the crimp is complete. Finish the squeeze, or use the quick-release lever if your tool has one.
Should I solder after crimping?
A correct crimp is designed to work without solder. Adding solder can make the wire stiff near the joint, which may crack under vibration.
How tight should a crimp be?
Tight enough that the wire does not pull out when tugged, but not so tight that it cuts strands or cracks the terminal. A full-cycle ratchet takes most of the guesswork out.