How to Set Up and Connect a Stick Welding Machine
To set up a stick welding machine, plug it into a suitable outlet with the power off, connect the electrode holder and ground clamp to the output sockets (usually electrode positive for common rods), clamp the ground to clean metal, load a rod, and set the amps for that rod size. Then turn the machine on and strike an arc on scrap. Arc welders work the same way, because arc welding is another name for stick welding.
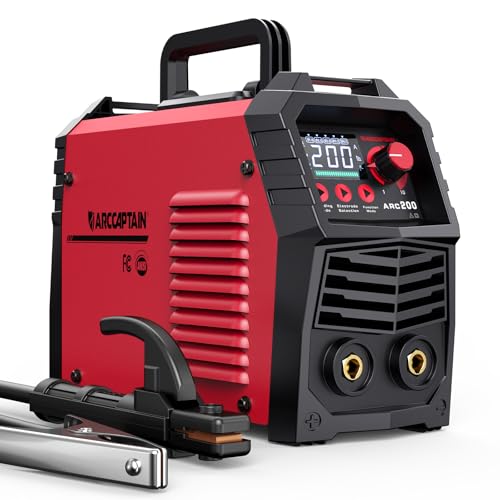 ARCCAPTAIN ARC200Best overall
 YESWELDER ARC-205DS PROBest for power
 Eioehtl portable welderHighest rated output
What you are connecting
A stick welder has two output cables. One ends in an electrode holder, often called the stinger, which grips the rod. The other ends in a ground clamp, which attaches to your workpiece. Together with the rod and the metal, they form a circuit, and the arc happens where the rod meets the work.
Most modern inverter welders also have a front panel with a current knob, a display and a mode switch. Many add hot start, arc force and anti-stick, which make striking easier. If you are still choosing a machine, our best stick welding machine comparison lines up amps, duty cycle and weight so you can match one to your work.
Before you plug in: workspace and power
Set up first, power second. Clear flammable items from the area, work on a dry floor or a non-flammable surface, and keep a fire extinguisher within reach. Welding throws sparks and hot slag, and stick welding is often done in garages and barns where dust, rags and fuel cans collect.
Check what power you have. Many stick welders are dual voltage and accept 120V or 240V. Lower voltage is convenient, but it limits output, and thicker steel and larger rods are best welded on 240V. Make sure the outlet matches the plug and the circuit can carry what the welder draws. Check the welder's manual for the minimum breaker size.
- Use an outlet on a dedicated circuit when you can.
- If you need an extension cord, choose a short, heavy-gauge one rated for the welder's current draw.
- Never use a damaged cord or adapter.
- Keep the machine away from water and wet ground.
Step-by-step: connecting the cables
Follow this order every time. The power switch stays off until the end.
- Place the welder on a stable, dry surface where the fan can pull in air freely.
- Inspect both cables for cracked insulation, loose lugs or worn clamps.
- Push the electrode holder cable plug into the front socket and twist it, usually about a quarter turn, until it locks. Many small inverters use this quick-connect style plug.
- Do the same with the ground clamp cable in the other socket. Loose plugs get hot and cause a weak, unstable arc, so make sure both are snug.
- Clamp the ground to bare, clean metal on the workpiece or the welding table, as close to the weld area as practical. Grind off paint, rust or mill scale where the clamp bites.
- Plug the welder into the outlet, then switch it on.
Choosing polarity
Polarity decides which socket each cable uses. Most common rods, including 6010 and 7018, run on electrode positive (DCEP), which means the electrode holder goes in the positive socket and the ground clamp in the negative socket. Some rods, such as certain 6013 types, are often run either way. The box or data sheet that comes with your rods states the correct polarity, so check it each time you change rod types.
Sockets are normally marked with plus and minus signs. If the markings are unclear, check the manual rather than guessing, because the wrong polarity gives a rough arc and poor results.
Setting amps, mode and arc helpers
Select stick mode if your welder also offers lift TIG. Then pick the amps for your rod. Bigger rods and thicker steel need more current. Rod makers print a recommended range on the box, so start in the middle of that range and adjust on scrap.
Specs differ between machines, so check the rod range before you buy rods. The table shows the figures published for a few welders on our comparison page.
| Welder | Max amps | Rod range or size | Lift TIG | Arc helpers |
|---|---|---|---|---|
| ARCCAPTAIN ARC200 | 200A | 0.063 to 0.197 in | Yes | Hot start, arc force, anti-stick |
| YESWELDER ARC-205DS PRO | 205A | Not listed | Yes | Hot start, arc force, anti-stick |
| Eioehtl 250A portable | 250A | 0.094 to 0.125 in | Not listed | Hot start, arc force, anti-stick |
| Sefaspe ARC 200Pro | 200A | 0.098 to 0.157 in | Yes | Hot start, arc force, anti-stick |
Safety checks before the first arc
Electric shock, arc flash and burns are the main risks, so gear up before you strike.
Wear an auto-darkening or fixed-shade welding helmet, flame-resistant long sleeves, dry insulated gloves and leather boots. Never watch the arc with bare eyes, and protect nearby people too. Use hearing protection if you are grinding or chipping slag. Weld in a ventilated area, because fumes from rods and coatings should not be breathed. Do not weld on containers that held fuel or chemicals.
Keep your hands and the cables dry. Some welders include a voltage reduction device (VRD), which lowers the no-load voltage and helps in damp conditions, but it does not replace careful habits. Always unplug the welder before you open the case, and never remove safety covers.
Strike an arc and troubleshoot
Clamp a rod in the holder, put a scrap of the same steel on the table, lower your helmet, and strike by dragging or tapping the rod tip on the metal. Lift slightly to hold a short arc. If the rod sticks, twist it free or release it from the holder. Anti-stick and hot start help here on machines that have them.
If the arc is erratic, check the ground connection first, then cable plugs, then the rod condition and amp setting. If the machine shuts down, it may be protecting itself from overheating. Let it cool with the fan running, and respect the duty cycle. For comparison, the highest duty cycle on our stick welder comparison is 60%.
Once the machine is off, let rods, clamps and the work cool. Wind the cables loosely and store rods dry, because damp rods weld poorly.
Frequently asked questions
Is connecting an arc welder different from a stick welder?
No. Arc welding is a broader term, but a stick welder is the usual arc machine for home and farm use, and the cable setup is the same.
Which socket does the ground clamp go in?
For most common rods on electrode positive, the ground clamp goes in the negative socket. Always confirm against your rod box and manual.
Can I run a stick welder from a 120V outlet?
Many dual voltage models can, but output is limited. Thicker steel and larger rods work better on 240V.
Why is my rod sticking to the work?
Amps may be too low, the arc too short, or the ground poor. Raise the amps slightly, check the clamp, and use hot start or anti-stick if available.