How to Run Air Compressor Lines Through a Garage
Plan the route first, mount the main line high on the wall or ceiling with a slight slope, then add a drop with a drain valve near each work area. For most DIY garages, HDPE-aluminum-HDPE pipe is the easiest choice because it bends by hand, does not rust inside and joins with compression fittings. Never use PVC for compressed air, because it can shatter under pressure.
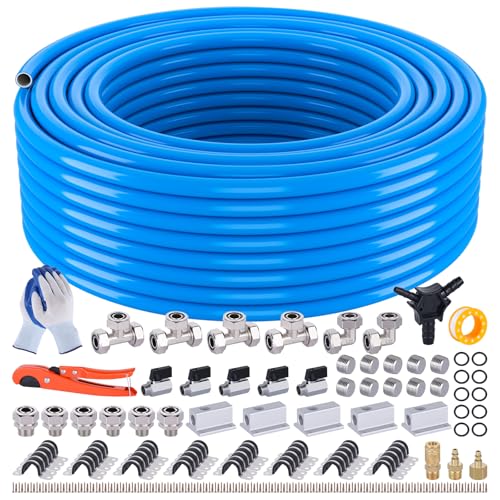 MOLAVIEE 200FT-3_4HDPE-Al-KITSBest overall
 Fideursus 9130GLongest run
 boeray HDPE Piping-200FTMost fittings
Start with a simple layout
Before you buy anything, sketch your garage and mark where the compressor will sit and where you actually use air. Common spots are the workbench, the area beside the car and near the garage door for inflating tires. Each of those gets a drop, which is a vertical section of pipe that ends at an outlet.
Keep the compressor in a spot with good airflow and a nearby outlet that suits its electrical needs. A corner is often best, since it keeps the noise and heat out of your main work area. Run the main line from the compressor along the wall or ceiling, close to the top, and branch down only where you need air.
Measure the route with a tape, not by eye. Add a bit extra for bends and mistakes. Pipe kits come in set lengths, and our best pipe for air compressor lines page lists kits from 100 to 300 ft so you can match your measurement to a kit.
Pick the right pipe
Hard piping gives steadier pressure at the tool and keeps hoses off the floor. The material decides how long the job takes and how much skill it needs.
PVC is the one material to avoid. It can crack and throw sharp fragments when it fails under pressure, and compressed air stores a lot of energy. Even if a neighbor says theirs has held up for years, it is not worth the risk.
| Pipe type | Install effort | Rust inside | Notes |
|---|---|---|---|
| HDPE-aluminum-HDPE | Low. Bends by hand, compression fittings, no glue | No | Good fit for DIY garages. A 3/4 in line suits most home shops |
| Black iron | High. Threading and many joints | Yes, over time | Strong, but heavy and slow to install |
| Copper | High. Soldering skill needed | No | Neat result, needs a torch and practice |
| PVC | Easy, but unsafe | No | Never use for compressed air |
Gather the parts and tools
A kit saves guesswork because the fittings match the pipe. For example, the MOLAVIEE 3/4 in kit on our comparison page has 200 ft of HDPE-aluminum-HDPE pipe, 5 aluminum outlet blocks, 5 drain valves and a bevel tool and pipe cutter in a 170-piece set. Its listing states a rating of 200 PSI at 73°F and 160 PSI at 140°F, plus a bend radius of 6 to 8 inches.
If you want to see how fitting types differ, our best air compressor fittings page compares them. Whatever you buy, check that the working pressure rating is above what your compressor produces.
- Pipe, tees, elbows and straight fittings sized to match
- Outlet blocks or manifolds, plus plugs for unused ports
- Drain valves for low points
- Pipe cutter and bevel tool (many kits include them)
- Wrenches, screwdriver, drill and wall anchors or clips
- Teflon tape for threaded joints
- Safety glasses and work gloves
Install it step by step
Work from the compressor outward, and finish all mounting before you pressurize anything.
Cut the pipe square with a proper cutter, then bevel the end so the fitting seats cleanly and the O-rings are not damaged. Rough or angled cuts are a common cause of slow leaks.
- Turn off and unplug the compressor, and release any air from the tank.
- Find studs or joists, then mount clips or anchors along the planned route.
- Install the main line first. Mount it high and give it a slight slope, so moisture runs toward one low end.
- Add a shutoff valve near the compressor, so you can isolate the system when you work on it.
- Build each drop by taking the branch off the top of the main line, then turning down. This helps keep water in the main line rather than running straight to your tool.
- Fit an outlet block at the end of each drop at a comfortable height, and install a drain valve at the bottom of each drop or low point.
- Plug unused ports, tighten fittings snugly and connect the compressor to the main line.
Handle moisture and drains
Compressing air also concentrates the water vapor in it, and that water collects in the pipe. This is why a sloped main line and drain valves matter. A kit with several drain valves, like the 5-valve kit mentioned above, lets you place one at each low point.
Open the drains now and then to let water out, ideally after a long session. If you spray paint or run sensitive tools, consider adding a water separator or filter at the tool end. Bends in HDPE-aluminum pipe should stay within the stated radius, since tight kinks can restrict flow and stress the pipe.
Pipe layout also depends on the compressor you own. If you are still choosing one, our best air compressor for home garage page covers options sized for garage use.
Test for leaks and stay safe
Close the drains, then bring the system up to pressure slowly. Brush soapy water on every joint and watch for bubbles. Tighten any joint that bubbles, or depressurize and re-cut and reseat the pipe if needed. Then shut off the compressor and watch the gauge. A steady drop points to a leak you have not found yet.
Some kits add a gauge at the manifold. The Fideursus 300 ft kit on our page includes one, which makes this check easier.
- Wear safety glasses whenever you pressurize, test or open the system.
- Always depressurize and unplug the compressor before cutting, adding or loosening fittings.
- Use hearing protection if your compressor is loud.
- Use a stable ladder when working overhead, and ask for help holding long pipe runs.
- Check for wires and plumbing in walls before drilling.
- Never run the system above the lowest rated pressure of any part, and consider the temperature rating if the garage gets hot.
Frequently asked questions
Can I bury the pipe or run it inside a wall?
Some HDPE-aluminum kit listings say the pipe can be buried or run inside walls. Check your kit's instructions first. Also keep an access point for the fittings, since a hidden joint is hard to fix if it leaks.
How high should I mount the outlets?
Pick a height that is easy to reach without bending or stretching, such as near bench height for the workbench. Place drops where you work, so you only need a short hose.
Do I need a shutoff valve?
A shutoff valve near the compressor is a good habit. It lets you isolate the pipe system for repairs without draining the tank.
Do I need a bigger compressor for a piped system?
Piping does not add air supply, it only delivers what the compressor makes. Check the air needs of your most demanding tool and compare it to your compressor's output before you plan the system.