How to Remove Upholstery Staples from Furniture Step by Step
Slide a staple remover or tack lifter under one leg of the staple, rock the handle gently to lift it, then grab the raised staple with pliers and pull it straight out. Work slowly with safety glasses on, and protect the fabric and the wood as you go. Most staples come out cleanly this way, and a few extra tricks handle the broken or buried ones.
 meillyocean ME-QDQ4PS-100Best overall
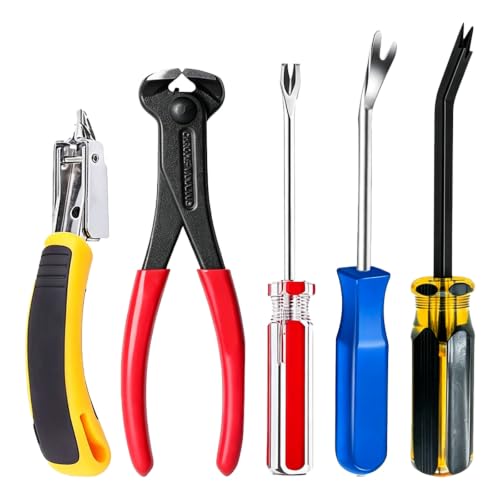 GOROBU Staple-remover-5pcTies for most pieces
 Fifatopo QDQ-StyleRust resistant hardened set
What You Need Before You Start
Upholstery staples are small, but they are driven in tight, and an old frame can hold hundreds of them. A little setup saves your hands and your furniture.
You do not need a full workshop. A few basic items cover almost every job:
- A staple remover or tack lifter with a thin, hardened tip
- Needle-nose or end-cutting pliers to grip lifted staples
- Safety glasses and light work gloves
- A small flat tool, such as a putty knife, to protect the wood
- A bowl or magnetic tray to catch loose staples
- Good light, such as a clip-on work lamp
Step-by-Step: Removing Staples
Set the piece on a stable surface at a comfortable height. Tip it on its side or back if that gives you a better angle. Keep the area clear so you can see every staple.
- Put on your safety glasses and gloves. Staples can snap and fly when they release.
- Peel back any dust cover or loose fabric edge so the staple line is visible.
- Find the staple's crown, the flat bar that sits on the surface. Slide the tip of your remover under one end of the crown.
- Rock the handle back gently to lift that end a little. Do not pry hard in one jerk.
- Move to the other end of the crown and lift it the same way, or grip the raised end with pliers.
- Pull the staple out in line with its legs, not sideways. Pulling straight keeps the legs from snapping off inside the wood.
- Drop each staple in your tray right away.
- Work along the row in order, and keep fabric under light tension with your free hand so it does not tear.
Choosing the Right Tool for the Job
Different tools solve different problems. A slim lifting tip is the main workhorse, but pliers and tack pullers finish what the lifter starts. Our upholstery staple remover comparison lists which products come as single tools and which come as sets with pliers and tack pullers.
The table below shows how common tool types are used in practice.
| Tool type | Best for | Watch for |
|---|---|---|
| Staple remover with a lifting tip | Lifting standard staples from wood frames | A thick tip will not slide under tight staples |
| Tack puller (U or V tip) | Tacks, brads, and staples in narrow spots | Can slip if you press at a steep angle |
| Needle-nose pliers | Pulling a lifted staple the rest of the way | Squeezing too hard can crush a leg and leave it behind |
| End-cutting pliers | Snipping off a stubborn staple or a broken leg | Cut ends can be sharp and may fly off |
How to Remove Staples from Wood Without Damage
Bare wood marks easily, and the tip of a remover can leave a dent if it pivots on the frame. The simplest fix is to slip a thin putty knife or a folded card under the tool where it rests. That spreads the pressure and keeps the finish clean.
Work with the grain when you can. Pulling across the grain is more likely to tear out a splinter, especially on older, dry hardwood. If a leg is firmly seated, lift slowly in small steps rather than one big pull.
Some remover designs include a curved base meant to protect the surface while you pry. If protecting a finished frame matters, check the listing for that detail. The best upholstery staple remover page notes which products mention surface-safe features.
When a Staple Is Stuck, Broken, or Flush
Not every staple cooperates. Some sit flush with the wood, and others have a crown that has rusted away.
For a flush staple, use the pointed tip of a tack puller to dig under one side of the crown. A few light taps on the handle can start the tip underneath. Once one end rises, switch to pliers.
For a staple that has snapped, leave the leg in the wood if it sits well below the surface. Pulling hard can break a chunk out of the frame. If the leg sticks up, grip it with needle-nose pliers and rock it side to side as you lift.
If the staple is rusty or fragile, try cutting the crown with end-cutting pliers and pulling each leg separately. Take your time. Rushing here is how fabric tears and frames split.
Safety Notes
Safety glasses are the single most important item here. Staples spring free under tension, and small metal pieces can travel quickly toward your face.
Keep your free hand out of the line of the tool. If a tip slips, it should hit wood or air, not your palm. Never pry toward your body.
Wear light gloves, but not loose ones that can snag. Sharp staple legs and cut ends can cut skin easily. Sweep up loose staples when you finish, since they can end up in carpet, pet paws, and bare feet.
Old furniture may have dust, dried glue, or old finish on it. Wear a dust mask if you see crumbling foam or flaking paint, and work in a ventilated space.
Choosing a Remover That Fits Your Project
For a single chair seat, one good remover plus pliers may be enough. For a sofa or a piece with layers of fabric and old repairs, a set with several tip types is easier to work with.
Look at the steel first. Our spec sheet lists chrome vanadium, high carbon, and alloy steel across different products, and hardened steel holds a thin tip better. Length matters for leverage. For example, the DneyLerf DLF003 is listed at 8.46 in, the longest single remover on our page, while the meillyocean 4-piece set is listed at 7.9 in. Weight and length are not published for every model, so check the listing if those matter to you.
If you want a set, the GOROBU 5-piece set lists chrome vanadium steel with pliers and tack pullers. Compare all the listed specs side by side on our upholstery staple remover comparison page before you decide.
Frequently asked questions
Can I use a flathead screwdriver instead of a staple remover?
You can in a pinch, but a screwdriver tip is usually thicker and more likely to dent the wood or tear fabric. A thin, purpose-made lifting tip slides under the crown more easily.
Do I need to remove every old staple before restapling?
Usually yes, at least the ones in the path of new staples. Leftover staples can block new ones from seating and can leave bumps under the fabric.
How can I keep the old fabric in good shape?
Lift staples from the fabric side first, and keep the fabric slightly taut as you go. If you plan to reuse the fabric as a pattern, label each piece before you pull it off.
What should I do with the staples afterward?
Collect them in a tray or magnetic dish as you work, then pour them into a sealed container for disposal. Loose staples are a hazard on floors and in carpet.