How to Remove Fluid From a Fluid Extractor
Most fluid extractors empty one of two ways: you pour the fluid out through the spout or drain port into a catch container, or you use the pump's pressure or flow to push it out through a hose. Check your manual for which one your model uses, work over a container twice the size of the load, and wear eye protection and gloves. Then wipe, rinse and store the unit so the next job starts clean.
 VEVOR YS-087BBest overall
 Lustriix QDSDCYBBest compact dual-mode
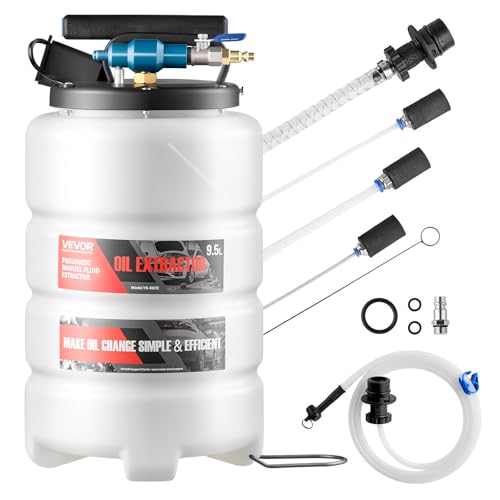 VEVOR YS-087CLongest tube
Check how your extractor is built first
Extractors do not all empty the same way. Some have a pour spout or a drain valve near the base. Others expect you to pressurize the tank and push fluid out through a hose. Syringe-style units simply push the plunger back out into a container.
Look for the markings on the tank and read the manual before you start. If you no longer have it, search for the model number on the maker's site. Guessing at pressure on a tank that was only built for vacuum is where most mistakes happen.
Tank size also affects how you handle the job. A full tank is heavy and sloshes. Our best fluid extractor page lists tanks from 0.2L to 15L, and a full 15L tank is a very different lift than a small syringe unit. Pick a catch container that holds the whole load with room to spare.
Get set up and stay safe
Fluid that has just come out of an engine can be hot. Let it cool until you can touch the tank comfortably before you move it. Hot oil causes burns, and hot coolant in a closed tank can spray when you open it.
Set up on a flat, stable surface outdoors or in a well-ventilated garage, away from sparks, pilot lights and open flames. Put down a drip tray or cardboard in case of spills.
- Wear safety glasses and nitrile or other chemical-resistant gloves.
- Use a catch container with a wide mouth or a funnel, and label it with what it holds.
- Keep brake fluid away from painted surfaces, since it can damage paint.
- Never put gasoline or other volatile fluids into an extractor unless the maker says it is rated for them. Some listings for the models we compare specifically warn against gasoline and volatile fluids.
- Keep kids and pets out of the work area.
Method 1: Pour it out
This is the simplest way, and it works for most manual and dual-mode tanks. First, release the vacuum. Open the vent or pressure-release valve, or loosen the cap slowly, until you hear air rush in. Skipping this step is the main cause of fluid that will not come out or comes out in a surge.
Next, set the tank over your container. If there is a spout or drain valve, open it slowly and let gravity do the work. Tilt the tank gently toward the spout as the level drops. If there is only a top opening, pour slowly and keep a firm grip on the handle.
A semi-transparent tank, like the 9.5L reservoir on the VEVOR YS-087C, lets you see the level, so you can tell when it is empty. With an opaque tank, tilt it until the flow stops, then let it drip for a minute.
Method 2: Use pressure or pump power to push fluid out
Some dual-mode models, such as the 15L VEVOR YS-087B or the 6.5L Lustriix, work with an air compressor as well as by hand. Whether a particular unit can be run in reverse to push fluid out is something only its manual can tell you, so do not assume it can.
If the maker allows it, the general process looks like this:
- Place the output hose in your catch container and secure it so it cannot whip around.
- Keep the regulator at the lowest setting and stay under the pressure limit printed on the tank or in the manual.
- Add pressure in short bursts and watch the flow.
- Stop when air starts to hiss out, then vent the tank fully before you move it.
| Method | Best for | Watch out for |
|---|---|---|
| Pour from spout or drain | Manual and dual-mode tanks | Release vacuum first, tilt slowly |
| Pressure-assisted push-out | Large tanks, if the maker allows it | Stay under the rated pressure, secure the hose |
| Electric pump discharge | 12V pump kits | Keep cables away from fluid, hold the hose in the container |
| Syringe plunger | Small jobs | Work in small batches |
Method 3: Electric pumps and syringe-style units
An electric pump kit, such as the Harpy Eagle 100W 12V model, moves oil through hoses instead of storing it in a big tank. The listing says it includes a clip that holds the hose in place while you drain oil into a container, plus quick-release plugs to prevent spills during storage. Use the clip, seat the hose firmly in the container, and then run the pump. Keep the power cable and clamps out of any spilled fluid.
Syringe-style extractors, like the 200cc OEMTOOLS unit on our list, are the easiest to empty. Point the tip into the container and push the plunger. Because the capacity is small, empty it after every draw instead of waiting for it to fill.
Clean the extractor after emptying
Fluid left in the tank and hoses can thicken, and different fluids should never mix. Cleaning also keeps the seals working, and a good seal is what makes suction possible.
Wipe the outside first so you do not carry oil onto your hands or the next job. Let the tank drain for a few minutes with the opening down. For the inside, use a small amount of fresh fluid of the same type or a cleaner recommended by the maker, swirl it around, and pour it out. Avoid harsh solvents unless the manual allows them, since some can damage plastic tanks and rubber O-rings.
Run any tubes through the same process. Hang them so they drain fully, then store them coiled loosely. Check the sealing rings for cracks or flat spots before you put the cap back on.
Dispose of the used fluid properly
Used oil, coolant, brake fluid and transmission fluid should never go down a drain, onto the ground or in household trash. Pour each fluid into its own sealed container with a tight lid.
Many auto parts stores, service shops and local hazardous waste sites accept used oil and other automotive fluids, but rules differ by area. Call ahead or check your local waste authority's website. Coolant in particular is toxic to pets, so clean up any spill right away.
If you take on more than one job, our fluid extractor comparison shows which models handle oil, coolant and brake fluid, so you can plan to keep a separate extractor, or at least separate tubes, for each fluid.
Fixing common problems
If nothing comes out, the vacuum is probably still holding. Open the vent and try again. If the flow is slow, check that the outlet is not blocked and that the tank is tilted toward it.
If fluid leaks around the lid, inspect the sealing ring and the fittings. Replace worn rings and make sure the cap is seated properly before the next use. If a tank swells or looks distorted, stop using it and contact the maker.
Frequently asked questions
Can I leave fluid in the extractor between uses?
It is better not to. Fluid can leak, absorb moisture or mix with the next fluid you draw. Empty it and cap the tank when the job is done.
Do I need to release the vacuum before opening the tank?
Yes. Vent the tank first so the fluid does not surge or fail to flow. Open the vent or loosen the cap slowly.
Can I reuse oil I removed from my engine?
Generally no. Used oil holds contaminants, so take it to a collection point rather than putting it back.
Is it safe to push fluid out with an air compressor?
Only if your manual says the tank is rated for pressure. Keep the regulator low and never exceed the stated limit.