How to Properly Use a Digital Caliper
Clean the jaws, close them fully, press zero, then measure with light, even pressure and read the display while the jaws are still on the part. Use the outside jaws for width, the small upper jaws for openings, and the depth rod for holes and recesses. Repeat each reading two or three times so you can trust the number.
 Kynup 170-2Best overall
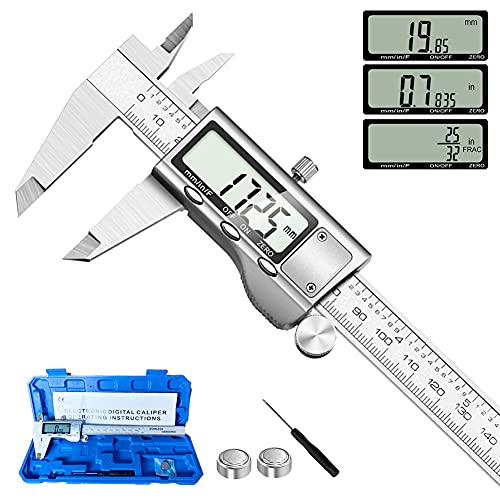 Jiavarry 20-FFour measuring modes
 LOUISWARE Silver Digital CaliperShortest auto-off timer
Know the parts before you measure
Most digital calipers have the same layout. A long beam with a fixed jaw sits at one end, and a sliding jaw moves along it. The display, a zero button and a unit button sit on the slider, and a thumb roller moves it smoothly.
Four parts do the real work. The large outer jaws grip the outside of a part. The small upper jaws, sometimes called inside jaws, fit into openings. A thin depth rod slides out of the end of the beam. A locking screw holds the slider in place so the reading does not change when you lift the tool away.
Many 6 in models cover 0 to 6 in, which is 0 to 150 mm. The models on our best digital caliper page list a 6 in range. If your part is longer than the range, a caliper is the wrong tool for it.
Get the caliper ready
Good readings start before the first measurement. Dirt, oil or a tiny chip on a jaw face changes the number, even if you cannot see it.
Follow this short routine each time you pick the tool up:
- Wipe both jaw faces and the part with a clean, dry cloth.
- Slide the jaws fully closed and check that no light shows between them.
- Press the zero button so the display reads 0.000 in or 0.00 mm.
- Pick your unit with the unit button: inch, mm, or fraction if your model has it.
- Open and close the jaws once more, then check that the display returns to zero.
Measure outside, inside, depth and step
Each type of measurement uses a different part of the caliper. The table gives a quick reference, and the notes below it cover the technique.
Whatever you measure, keep the beam square to the part. If the jaws sit at a slight angle, the reading comes out larger than the true size.
| Measurement | Part to use | How to do it |
|---|---|---|
| Outside (width, thickness, diameter) | Large outer jaws | Open wider than the part, close gently until both jaws touch, then lock and read. |
| Inside (hole or slot width) | Small upper jaws | Close the jaws, insert them, open until they touch both walls, then read. |
| Depth (hole or recess) | Depth rod at the end of the beam | Rest the end of the beam on the top edge, push the rod down until it stops, then read. |
| Step (shoulder height) | Step face at the end of the slider | Set the beam end on the lower surface, slide the slider until it meets the step. |
Use the right touch and read the display
Light, steady pressure matters more than anything else. Squeezing hard bends the jaws a little and can mark soft materials such as wood, plastic or aluminum. Close the jaws until they just make firm contact, and stop there.
For round parts, rock the caliper slightly while you close the jaws. The smallest reading you see is the true diameter, because that is when the jaws sit across the widest point of the circle. For inside measurements, do the opposite: the largest reading is usually the true size.
When the jaws touch, tighten the locking screw if you need to lift the tool off the part. Then read the display straight on, so you do not misread a digit.
Pay attention to the difference between accuracy and resolution. Accuracy is how far a reading may stray from the true size. Resolution is only the smallest step the display shows. The models on our comparison page list an accuracy of 0.001 in, and their display steps are 0.0005 in or finer, so the last digit on the screen is not a promise of that precision.
Use zero and unit modes to your advantage
The zero button is useful beyond the closed position. You can press it at any point to start a new reference, which makes it easy to compare two similar parts. Set the jaws on a known part, zero the display, then check how far another part differs from it. Press it again when you want to go back to a fresh start.
Unit modes help you match your plans. Inch and mm cover most work. Fraction mode is handy for lumber and plans written in fractions, and four models on our digital caliper comparison list inch, mm and fraction modes: Kynup, Jiavarry, HARDELL rechargeable and iGaging IP54.
Some calipers keep the zero reference after you switch them off. The iGaging Absolute Origin model lists this feature, along with an SPC/USB data port for sending readings to a computer. If your model does not have it, re-zero every time you turn the tool on.
Safety and care
A caliper is a gentle tool, but a few habits protect both you and the tool.
Keep it away from anything moving. Never measure a part that is still spinning or running on a lathe, drill press or saw. The jaw edges are sharp enough to cut, and a grabbed caliper can pull your hand in. Stop the machine first.
Wear safety glasses when you measure near cutting, grinding or drilling. Small chips and dust fly farther than you expect. Remove burrs from a freshly cut edge before measuring, since they are sharp and also give false readings.
Keep the tool dry and clean. Stainless steel resists rust better than plastic, and some models list a dust and splash rating, but the electronics still prefer a dry cloth to a soaking. Store the caliper in its case if you have one, and switch it off or let the auto-off timer do it. The models on our page list auto-off times of 4 or 5 minutes.
Keep button cells out of reach of small children and pets. They are a swallowing hazard.
Common mistakes to avoid
Most bad readings come from a short list of habits. Check these first if a number looks off:
- Skipping the zero check, so the whole reading is shifted.
- Measuring with dirty jaws or a part with burrs.
- Pressing too hard, which bends the jaws or squashes soft material.
- Tilting the caliper, so it does not sit square across the part.
- Reading the display after you slide the slider off the part without locking it.
- Trusting one reading instead of repeating the measurement a few times.
Frequently asked questions
Why does my caliper reading keep drifting?
Dirt on the jaws, a weak battery or a missed re-zero are the usual causes. Clean the jaws, close them fully, press zero and test again. If the drift continues, try a fresh battery.
How often should I zero a digital caliper?
Zero it at the start of every session, and again any time the display does not read zero with the jaws closed. Zero it more often if the tool powers off between measurements.
Can I measure a hole's depth with the outer jaws?
No. Use the depth rod. Rest the end of the beam on the top edge of the hole, push the rod to the bottom and read the display. The outer jaws cannot reach into the hole.
Which unit mode should I use?
Use mm for metric parts, inches for most US machining, and fraction mode for lumber and plans written in fractions. Pick the mode that matches your drawing so you avoid converting by hand.