How to Properly Use a Coil Spring Compressor
Match the compressor to your spring's diameter and load, seat the forks fully on the coils, then tighten in small steps, alternating sides, until the spring is loose on its mount. Release it just as slowly. Never stand in line with a compressed spring, and never use a tool rated below your spring's load.
 Amerbm 2010ATHBest overall
 Orion Motor Tech 2328BXWidest spring range
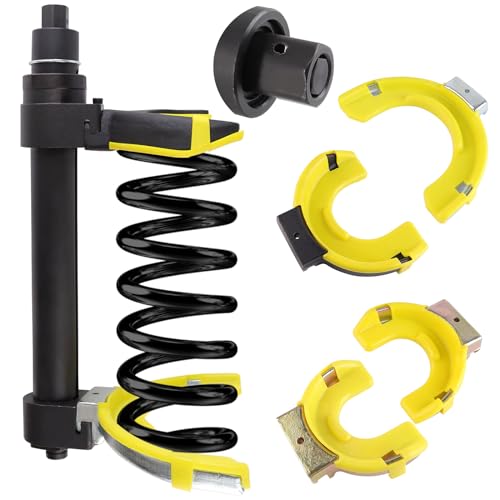 aremnry 2010ASCBest with carrying case
Before you start: pick the right tool for the spring
A coil spring stores a lot of energy. If it slips, it can cause serious injury, so the compressor has to match the job. Check two things first: the spring's outside diameter and its load.
Measure the outside diameter and compare it with the range your forks or jaws cover. Then choose a tool rated well above the spring's load. Stiff truck and lifted-vehicle springs need the higher ratings. Our best coil spring compressor page lists load ratings and diameter ranges side by side, which makes this check quick.
The table below shows how published specs differ between a few kits.
| Kit | Load capacity | Spring diameter range | Drive |
|---|---|---|---|
| Amerbm 2010ATH | 9921 lb | 2.6 to 8.3 in | Impact compatible |
| OMT 2328BX | 2200 lb | 0.9 to 11 in | Not for air or pneumatic tools |
| BILITOOLS B1F91601 | 5512 lb (one fork pair) | 2.56 to 8.35 in | 22 mm wrench or socket |
| VEVOR XC4027A | 9921 lb | 2.6 to 8.3 in | 7/8 in socket, not impact compatible |
Safety gear and setup
Wear safety glasses or a face shield and sturdy gloves. If you use an impact wrench, add hearing protection. Work on a flat, solid surface with the vehicle supported on proper jack stands, never on a jack alone.
Inspect the compressor before each use. Look for bent rods, damaged threads, cracked forks or a missing safety pin. Do not use a damaged tool.
- Clean and lightly lubricate the threads before each use.
- Check that the forks you picked match the spring's outside diameter.
- Confirm the tool's load rating is above the spring's load.
- Clear the area of people and pets.
- Plan where you will stand: beside the spring, never in line with it.
How to install the compressor on the spring
Once the strut assembly is out of the vehicle, secure it in a sturdy vise or stand so it cannot roll or twist. Keep the clamping force away from the strut body in a way that avoids damage, and follow the vehicle's service manual.
Fit the forks onto opposite sides of the spring, with the safety lips or retaining tongues seated over the coil. Spread the two compressors as far apart as practical so the load stays balanced. Some kits suggest placing them about 180 degrees apart.
Check the fit of each fork before applying any force. The spring should sit fully in the fork, with nothing perched on an edge. If the spring is conical, a spacer may help. The BILITOOLS kit, for example, includes a square spacer for springs with different upper and lower coil diameters. Also note that some kits come in left-hand and right-hand versions, so check the spring's winding direction before you buy.
How to compress the spring
Turn each rod a little at a time and alternate sides. This keeps the spring straight and stops one side from carrying all the load. Short, even turns also let you spot a problem early.
Stop and recheck the fit if a fork starts to tilt or the spring begins to shift. Back off and reseat it rather than pushing on.
Compress only as far as needed. You are done when the spring is loose enough that the top mount nut can be removed and the top mount, seat and spring move freely.
- Tighten one side a few turns.
- Tighten the other side the same amount.
- Look at the spring and forks.
- Repeat until the spring is slack on the top mount.
- Remove the top nut only when the spring is clearly free of load.
Impact wrench or hand tool?
An impact-rated rod can save a lot of time, but it also makes it easier to overshoot. Only use an impact wrench if the tool is designed for it. The Amerbm 2010ATH is listed as impact compatible, while the OMT 2328BX says not to use air or pneumatic tools.
Hand tools are slower but give finer control. BILITOOLS recommends hand-tool operation with a 22 mm wrench or socket. If you do use power, keep the speed low and stop often to check the spring.
Some tools include overload protection, where a safety pin is designed to fail first if the load gets too high. It is a backup, not a reason to push the limits.
How to remove the compressor safely
Before you release the spring, confirm the new strut, top mount and seat are in place and the spring is seated correctly in its pockets. Then back off each rod a little at a time, alternating sides, just as you compressed it.
Keep your face and body out of line with the spring while it expands. Once the spring is fully relaxed, remove the forks and check that the spring ends sit properly in the seats.
Clean and store the tool. A carrying case helps keep forks and rods together. Replace any part that looks bent or worn.
About internal compressors and special cases
Internal compressors work from inside the spring, rather than gripping the outside. They are a different design from the external fork-style tools described here, so follow the maker's instructions for those. The same ideas apply: match the size, go slowly, and keep out of the spring's line of fire.
Engine valve springs need a different tool altogether. The Amerbm listing, for example, states that it is not an engine valve spring tool.
Frequently asked questions
Can I use one compressor instead of two?
A single compressor can leave the spring unbalanced. Using a pair on opposite sides keeps the load even, so follow the tool's instructions and use both.
How tight is too tight?
Stop once the spring is slack on the top mount. Going further adds load and risk without helping the job.
What if a fork starts to slip?
Stop turning, back off slowly and reseat the forks. Do not continue until the spring sits fully in the fork.
Do I need to lubricate the threads?
Yes. Listings for several kits advise lubricating the threads before each use. It reduces wear and makes turning smoother.
Can I use a compressor with a damaged pin or rod?
No. Replace worn or bent parts first, since they may fail under load.