How to Paint Edges Without Tape
You can get crisp edges without tape by loading a good angled brush lightly, painting a thin line just off the edge, and then easing the bristles into the corner. A paint edger with guide wheels or a small pad is a good alternative if your hand is not steady. Either way, slow and steady passes with a lightly loaded tool matter more than speed.
 Voomey 7 pc paint edgerBest overall
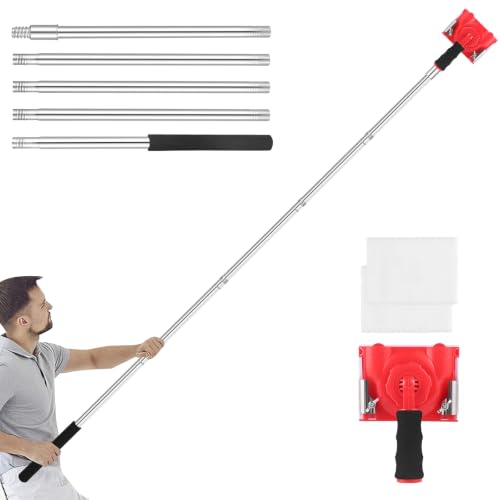 Woxnoc paint edger tool for walls-12APole included for ceilings
 Dekonmon XB7Most pieces in the kit
Why tape is optional, and when it still helps
Painter's tape is useful, but it is not the only way to get a straight line. Tape can bleed if it is not sealed well, and it can pull paint off when removed. Many people find that cutting in by hand or with an edger is faster once they get the feel for it.
The main idea is simple. You control how much paint reaches the edge, and you control where the tool rests. If you manage those two things, the line stays clean. Tape is still a fair choice on rough textured walls or when you are painting a bold color next to a very light one.
What you need before you start
Good prep makes the biggest difference. Gather your tools first so you are not hunting for them with a wet brush in your hand.
- A 2 to 2.5 inch angled sash brush with firm, tapered bristles
- Or a paint edger, either wheel-guided or pad-only
- A small paint cup or a tray, so you are not dipping from a heavy can
- A damp rag and a dry rag for quick fixes
- Drop cloths for floors and furniture
- A step stool or ladder that lets you reach the line comfortably
The brush method, step by step
A brush gives you the most control and works on any surface. The steps below follow the common cutting-in technique, and they work for wall-to-trim edges as well as wall-to-ceiling lines.
- Clean the surface. Dust and grease keep paint from sticking evenly and can make the edge look ragged.
- Dip only the first third of the bristles into the paint, then tap each side gently on the cup. Do not wipe the brush hard on the rim, because that removes too much paint.
- Start about an eighth to a quarter inch away from the edge. Press the bristles lightly so they fan out a little.
- Slowly push the brush toward the edge. The bristles will spread and fill that small gap, and the paint will stop where you want it to.
- Pull the brush along the edge in one steady stroke. Work in sections of about two to three feet, then reload.
- Smooth any thick paint out right away. Paint that pools at the edge is what causes drips and ridges.
Using a paint edger instead
A paint edger is a small pad on a handle, and many have wheels that ride along the surface next to the one you are painting. That keeps the pad at a steady distance from the line. It can be a good fit for long runs along a ceiling or baseboard.
Wheel-guided models help if your hand wobbles. Pad-only kits give you more freedom around corners and window frames, but they need a steadier hand. Our best paint edger page compares guide style, pad width and kit contents side by side, so you can see which type suits your room.
Whichever you choose, load the pad lightly. A pad that is too wet will push paint under the wheel or past the edge. Wipe the wheels now and then, because dried paint on them can leave marks on the surface they roll against.
Comparing your options
Here is how the main approaches differ. The product examples come from the specifications on our comparison page.
The Novazzi edger, for example, has dual guide wheels and a 4.7 in pad. The Voomey kit has a 9 in pad with a rotating handle and a corner tool. The Woxnoc edger has a guide wheel and ships with a pole that lists a 78.7 in maximum reach. The Dekonmon kit has a 7 in pad and lists 15 pieces, including 5 replacement pads.
| Method | Best for | Skill needed | Things to know |
|---|---|---|---|
| Angled brush | Any edge, tight corners, trim | Moderate, improves with practice | Most control, slowest on long runs |
| Wheel-guided edger | Long straight runs along ceilings or trim | Low to moderate | Wheels need regular wiping; pole support varies by model |
| Pad-only edger kit | Mixed work with corners and details | Moderate | Corner and detail pads add flexibility |
| Edger on an extension pole | High ceiling lines | Low to moderate | Fewer ladder trips, but needs a steady, slow pace |
Tips for the wall and ceiling line
The ceiling edge is where most people struggle, because you are working overhead. Set your ladder so you can see the line straight on. Reaching too far to the side makes your hand drift.
If you use an edger on a pole, check that the handle fits your pole's thread and tighten it before you start. Some of the kits on our paint edger comparison list pole compatibility, and only some include a pole, so check the listing before you buy.
Paint the ceiling first and the walls second. That way, any small overlap on the wall gets covered when you cut in the wall edge. Keep a wet edge as you go, since dry paint next to fresh paint can show a visible ridge.
Fixing mistakes without tape
Slips happen. Wipe fresh paint right away with a damp rag wrapped around a fingertip or a flat tool. For a dry smudge, let it cure fully, then repaint the neighboring surface with a small brush and a steady hand.
If a line looks wavy once dry, do not scrub it. Apply a second thin coat along the line instead. Thin coats are easier to keep straight than one heavy coat.
Safety notes
Ladders cause real injuries. Keep both feet on the steps, keep your belt buckle inside the rails, and move the ladder rather than leaning out. Do not paint above your reach from the top step.
Ventilate the room, especially with oil-based paint or strong-smelling products. Wear gloves, and wear safety glasses when you work overhead so drips do not reach your eyes. If you are painting near outlets or switches, turn off power at the breaker and remove the cover plates first. Never let a metal pole touch exposed wiring or a light fixture.
Frequently asked questions
Can I paint a straight line on textured walls without tape?
Yes, but it is harder. A stiff, angled brush works better than a pad on texture, and you may need to go over the edge a second time to fill in the low spots.
How often should I reload the brush or pad?
Reload when the paint stops flowing smoothly, usually every few feet. Working with a brush or pad that is too dry causes streaks, and one that is too wet causes drips.
Do I need to wash a pad edger between coats?
Not always. Wrap the pad in plastic wrap or a sealed bag for short breaks. Clean it fully when you finish, following the paint's cleanup directions.
Should I cut in before or after rolling the wall?
Most people cut in first, then roll while the edge is still slightly wet. That helps the two areas blend and reduces visible borders.