How to Paint a Pumpkin With Acrylic Paint
Yes, you can paint a pumpkin with acrylic paint. Wipe the pumpkin clean and dry, add a base coat if you want bright colors, paint in thin layers, and let each layer dry before the next. Acrylic dries fast and is waterproof once cured, which suits both real and craft pumpkins.
 Shuttle Art SA MAP36Best overall
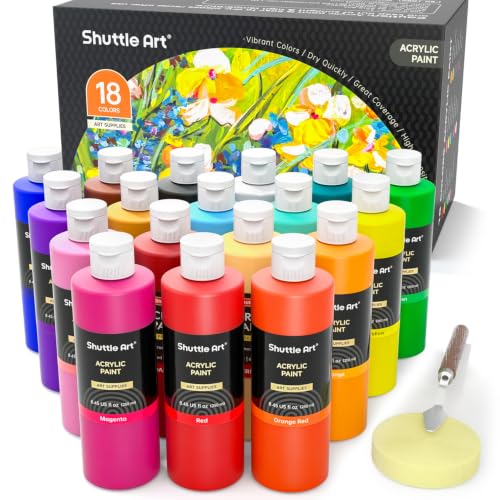 Shuttle Art SA AP18-8ozLarge bottles for batches
 unuaST COLOR-01Pump bottles, 300 ml each
Can you use acrylic paint on pumpkins?
Acrylic craft paint is one of the most practical choices for pumpkins. It is water-based, so you can thin it slightly, clean brushes with soap and water, and fix mistakes while the paint is still wet. It also dries quickly, which means you can layer colors and add details in a single sitting.
The listings on our best paint for pumpkins page say the same about the sets we compare: they are acrylic, they dry fast, and they form a waterproof layer once dry. Some listings also name pumpkin painting directly. For example, the Caliart 36-color set lists pumpkin painting among its uses. Others, such as the Shuttle Art 36-color set, list wood, rock, canvas, ceramic and plastic surfaces without naming pumpkins, though a pumpkin's skin behaves much like those smooth, hard surfaces.
One thing to keep in mind is that a real pumpkin is a food crop that keeps changing. Paint sits on the skin, but the fruit underneath will still soften over time. Treat a painted real pumpkin as seasonal decor.
What you need before you start
You do not need much. A small set of paints, a few brushes and some basic household items will cover most designs. If you are choosing paint, the sets on our comparison page range from compact tube sets to large bottles, so match the amount to the number of pumpkins you plan to paint.
- Acrylic craft paint in the colors you want, plus white for mixing and touch-ups
- Brushes in a few sizes: a flat or round brush for large areas and a fine brush for details
- A pumpkin with a clean, firm, unblemished skin, or a craft pumpkin made of foam or plastic
- Gesso or white acrylic paint for a base coat (optional but helpful on dark or orange pumpkins)
- A damp cloth or paper towel, plus a dry one
- A paper plate or palette for mixing
- Newspaper or a drop cloth to protect your table
- A clear acrylic spray sealer if the pumpkin will sit outdoors
Step-by-step: painting the pumpkin
Work in a well-lit spot with the pumpkin resting on a stable base. A small bowl or a rolled towel keeps it from rocking while you paint.
- Choose the pumpkin. Look for a smooth skin without soft spots, cracks or mold. White and pale pumpkins show colors best. Orange pumpkins work too, but light colors may need extra coats.
- Clean it. Wipe off dirt with a damp cloth, then dry it fully. Paint will not grip well on a wet or dusty surface. Leave the stem alone, or paint it last.
- Add a base coat. A thin layer of gesso or white acrylic evens out the surface and makes colors look truer. Let it dry until it no longer feels cool or tacky.
- Sketch lightly. Use a pencil or a thin line of diluted paint to mark where your design goes. Pumpkins are curved and ribbed, so simple shapes, stripes and dots tend to look better than fine, flat artwork.
- Paint in thin layers. Thick paint can run on a curved surface and take longer to dry. Two or three thin coats usually cover better than one heavy one.
- Let each layer dry. Acrylic dries quickly, but wait until the surface is dry to the touch before adding another color on top, or the colors may smear.
- Add details last. Use a fine brush for outlines, faces, patterns or metallic accents once the larger areas are dry.
- Seal if needed. For a pumpkin that will sit outside, a clear acrylic spray sealer adds a protective layer over the paint.
Choosing paint for the job
Most acrylic craft paints will do the job, but a few specs on the label or listing are worth checking. Coverage matters most, since a pumpkin's ribbed, uneven skin shows streaks easily. Listings that mention creamy, highly pigmented paint are a good sign, though the final result also depends on your base coat and technique.
If kids will help, look for an ASTM D-4236 listing. All of the ranked sets on our page list it as non-toxic. That is a helpful starting point, but the listings do not mention pets, so keep paint and brushes away from animals while everything dries. For a porch display, a lightfast listing is the stronger signal for resisting sun. The 30-color Shuttle Art set, for example, lists lightfast pigments in 12 ml tubes and includes three brushes.
The table below shows how a few sets from our page differ in size and extras. Use it to match the set to your project, and see the full pumpkin paint comparison for the rest.
| Set | Colors | Container size | Total paint | Notable extras |
|---|---|---|---|---|
| Shuttle Art 36 colors | 36 | 60 ml bottles | 2160 ml | Metallics, 12 brushes and a palette included |
| Shuttle Art 18 colors | 18 | 250 ml bottles | 4500 ml | Large bottles for batches |
| unuaST 14 colors | 14 | 300 ml bottles | 4200 ml | Pump bottles, accessories included |
| Shuttle Art 30 colors | 30 | 12 ml tubes | 360 ml | Lightfast listed, 3 brushes included |
| Caliart 36 colors | 36 | 59.15 ml bottles | 2129.3 ml | Metallics, 12 brushes, pumpkin painting named |
Tips for cleaner results
Curved surfaces behave differently from flat paper. Turn the pumpkin as you work instead of reaching across it, and rest your painting hand on a clean towel so you do not smudge wet areas.
If a color looks streaky, let it dry and add another thin coat rather than brushing over it while wet. Light colors over dark ones usually need an extra layer or a white base coat first.
Metallic gold and silver look good as accents on stems, outlines and patterns. Sets that include metallics, such as the 36-color Shuttle Art and Caliart sets, make this easy without buying extra paint.
Wash brushes with soap and water before the paint dries. Water-based acrylic is much harder to remove once it has fully cured.
Safety and care notes
Painting is low risk, but a few precautions help. Keep paint away from the mouth, and do not paint a pumpkin you plan to eat. Wash hands after painting, especially around kids.
If you use a spray sealer, apply it outdoors or in a well-ventilated space, and follow the directions on the can. Keep it away from flames and heat. If you plan to carve a pumpkin as well, use a proper pumpkin carving tool and cut away from your body. Carving a pumpkin after painting it can crack the paint, so finish the carving first when you can.
If you are decorating porch steps or a high shelf, use a stable step stool, not a chair, and place pumpkins where they will not roll or be knocked over.
Frequently asked questions
Do I need to prime a pumpkin before painting?
It is not required, but a thin base coat of gesso or white acrylic helps colors look brighter and cover more evenly, especially on orange pumpkins.
Will acrylic paint make a real pumpkin last longer?
Not reliably. Paint covers the skin but does not stop the fruit from softening. Check your pumpkin regularly and bring it in or replace it if you see soft spots or mold.
Can I use acrylic paint on craft pumpkins?
Yes. Foam, plastic and similar craft pumpkins take acrylic well. Wipe off dust first, and use a base coat if the surface is glossy.
How long should I wait between coats?
Wait until the paint feels dry to the touch. Acrylic dries fast, but thicker layers and humid air take longer, so check before adding the next coat.
Is acrylic paint safe for kids to use on pumpkins?
Look for an ASTM D-4236 non-toxic listing, then supervise as usual. Keep paint away from mouths and animals, and wash hands afterward.