How to Make Your Own Socket Organizer at Home
The simplest homemade socket organizer is a hardwood board with holes drilled to hold dowels, sized to match the square drive opening of each socket. If you own a 3D printer, you can also print clip rails that snap onto a base. Either way, plan on a test fit before you drill or print the whole set.
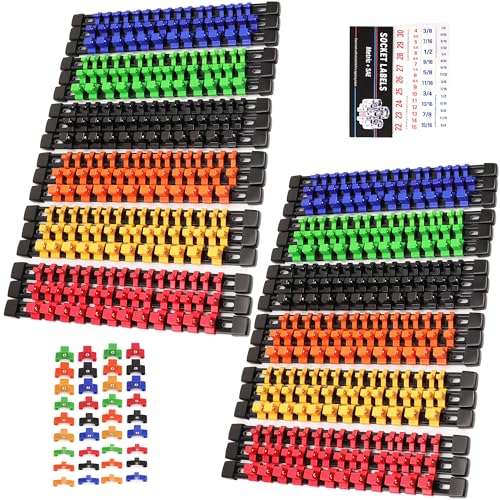 SWANLAKE GARDEN TOOLS SW-66175Best overall
 SWANLAKE GARDEN TOOLS SW-66162Best with wrench holders
 SEDY 85027Best magnetic clip rails
Choose the style that fits your tools and skills
Before you buy anything, decide how you want to store your sockets. The right design depends on how many sockets you own, which drive sizes you use, and what tools you already have in the garage.
The table below compares the four common homemade approaches. None of them needs special skills, but each has a different weak spot.
| Style | Tools needed | Best for | Watch out for |
|---|---|---|---|
| Wood block with dowels | Drill, saw, glue | Drawers and toolbox trays | Dowel fit takes some trial and error |
| Wood rail with drilled holes and pegs | Drill, saw, sandpaper | Wall mounting by size | Sockets can slide off if you bump it |
| 3D printed clip rail | 3D printer, filament | Holding sockets firmly in any position | Clip tension needs a test print |
| Magnetic strip on a board | Drill, screws, strip magnet | Quick access on a cart or wall | Metal filings collect on the magnet |
Gather your materials and measurements
Start by sorting your sockets by drive size: 1/4 inch, 3/8 inch and 1/2 inch. Count how many you have in each group, and leave room for a few more. A tray that is full on day one gets crowded fast.
Then lay out a typical set of sockets and measure the widest one in each drive group. That tells you how far apart to space the holes or clips so sockets do not bump into each other.
- Hardwood board such as oak or maple, or a sturdy plywood scrap
- Wooden dowels sized to each drive (1/4, 3/8 and 1/2 inch)
- Drill and matching drill bits or a drill press
- Wood glue and a clamp
- Sandpaper, a pencil, a ruler and a square
- Paint or colored tape for labeling SAE and metric sizes
- Safety glasses and a dust mask
Build a wood and dowel tray step by step
This is the classic weekend project. It works because a socket's square drive opening slips over a dowel and stays put through friction. Cut one tray per drive size so the dowels stay a consistent length.
- Cut the board to the length you want, and keep it narrow enough to fit your drawer.
- Mark a straight centerline down the board, then mark hole spots along it. Space them a bit wider than your largest socket in that drive group.
- Clamp the board firmly to your bench. Drill holes to the depth you want, using a piece of tape on the bit as a depth guide.
- Cut dowels to length. Longer dowels hold deep sockets better, but shorter ones are easier to load.
- Test fit one dowel in a socket. A snug but not tight fit is the goal. If it is loose, add a thin wrap of tape or choose a slightly larger dowel.
- Glue the dowels into the holes, wipe off any squeeze-out and let the glue cure fully.
- Sand rough edges, then finish with paint or a clear sealer so the wood resists oil and moisture.
Make one with a 3D printer
Printing is a good fit if you want clip-style holders. A clip rail has small spring arms that grip the socket's drive opening, so sockets stay in place even when you jostle the tray. Several designs are shared online, and you can edit them for your socket sizes.
Print a short test piece first. Adjust the clip size until a socket snaps in with a light push and comes out without a fight. Tough, slightly flexible filament such as PETG usually handles repeated clipping better than brittle plastics, though results vary by printer and settings.
Print rails in the three drive sizes, then attach them to a wood or plastic base. You can also print end caps so the rails slide out when you want to add or remove clips. That removable-clip idea is the same one used by commercial rails, such as the SWANLAKE 36-piece set, which lists removable clips and spare clips.
Layout and labeling tips
A good layout saves more time than a fancy build. Put sockets in order from smallest to largest, left to right, and keep SAE and metric on separate rails or in separate colors. Our best socket organizer page points out that color coding makes the right socket faster to find, and the same trick works for a homemade tray.
Label each hole or clip with a paint pen or a strip of tape. Mark the size at the front edge so you can read it at a glance. If you store deep and shallow sockets together, give them different rows so one does not hide the other.
Finally, think about where the tray will live. A drawer tray needs to be low and flat. A wall rail needs strong screws into studs or a pegboard, and the sockets add up in weight quickly.
Safety notes before you start
Wood and plastic projects are easy, but a few habits keep them that way.
- Wear safety glasses whenever you drill, cut or sand, and a dust mask when sanding or cutting wood.
- Wear hearing protection with a saw or drill press, especially in a closed garage.
- Clamp the board before drilling so the bit cannot grab and spin it.
- Keep hair, sleeves and jewelry away from rotating bits.
- Let a 3D printer nozzle and bed cool before touching them, and print in a ventilated space.
- Mount wall rails into studs or proper anchors, and keep heavy loads low enough to reach without a stool.
When buying makes more sense
Homemade trays are great for a small collection. If you own a large set or want rails that hold sockets in any position, a ready-made option can save a lot of time. For example, the SWANLAKE 36-piece clip rail set lists a capacity of 516 sockets across 1/4, 3/8 and 1/2 inch drives, and the AMM 18-piece set lists 258.
If you want to see how capacity, mounting and color coding compare, our socket organizer comparison lays the options out side by side. You can also use those specs as a guide for how many rails you need to build.
Frequently asked questions
What wood is best for a DIY socket tray?
Hardwoods such as oak or maple resist dents and wear well. Plywood works too if you seal the edges and surface so oil does not soak in.
How do I stop sockets from sliding off the dowels?
Make sure the dowel fits snugly in the socket's drive opening. A thin wrap of tape or a slightly larger dowel can fix a loose fit, and a rubber O-ring near the top of each dowel adds extra grip.
Can I use magnets instead of dowels?
Yes. A strip magnet on a board holds most steel sockets, and it is quick to load. Keep it away from metal shavings, since the magnet can collect them.
Do I need a drill press?
No. A hand drill works if you clamp the board and keep the bit straight. A drill press just makes the holes more consistent.