How to Hard Pipe Air Compressor Lines, Step by Step
To hard pipe air compressor lines, plan a layout, mount a main line with a slight slope, add drops with drain valves, join everything with compression fittings, then pressurize slowly and check every joint for leaks. For most DIY shops, HDPE-aluminum-HDPE pipe is the easiest material because it bends by hand, does not rust inside and needs no glue or soldering. Never use PVC for compressed air.
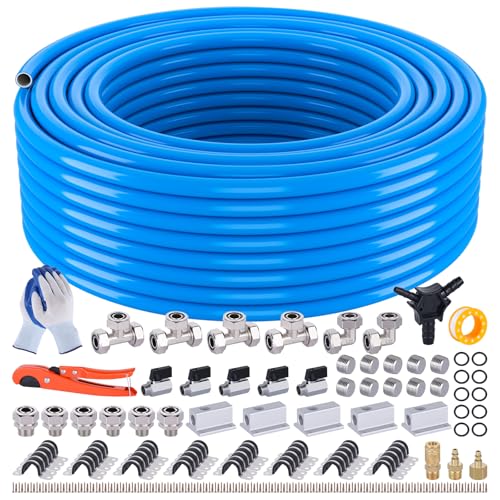 MOLAVIEE 200FT-3_4HDPE-Al-KITSBest overall
 Fideursus 9130GLongest run
 boeray HDPE Piping-200FTMost fittings
Choose the Pipe Before You Plan the Layout
The pipe material decides your tools, your skill level and how long the job takes. Black iron and copper both work, but they need threading, cutting or soldering, and that is where many first-timers get stuck.
HDPE-aluminum-HDPE pipe has an aluminum core between two polyethylene layers. It bends by hand, resists rust inside, and joins with brass compression fittings. Published kit specs for the 3/4 in versions we compare list a working pressure of 200 psi at 73°F and 160 psi at 140°F, with a bend radius of 6 to 8 inches. Our best pipe for air compressor lines page puts several kits side by side if you are still choosing.
PVC is the one material to rule out. It can shatter under pressure and throw sharp fragments, so it does not belong in a compressed air system, even if it seems to hold at first.
| Pipe type | Install effort | Rust inside the pipe | Notes |
|---|---|---|---|
| HDPE-aluminum-HDPE | Low. Hand bends, compression fittings | No | Common choice for DIY shops |
| Copper | Medium to high. Cutting and soldering | No | Needs soldering skill and a torch |
| Black iron | High. Threading and heavy lifting | Yes, over time | Strong, but heavy and slow to install |
| PVC | Not applicable | Not applicable | Never use for compressed air |
Plan the Layout and Gather Supplies
Start with a rough sketch of your room. Mark the compressor, every spot where you use air, and the route between them. Plan one drop near each work area, such as the workbench, the car bay and the door where you inflate tires.
Shorter runs lose less pressure, so avoid detours. A 3/4 in line suits most home shops, which matches what our pipe page recommends. If you are still deciding on the compressor itself, our best air compressor for home garage comparison covers the main specs.
Here is a basic supply list for a pipe-and-compression-fitting system:
- Pipe in the length your sketch needs, plus a little extra for mistakes
- Outlet blocks or manifolds for each drop
- Tees, elbows and straight fittings
- A drain valve for each low point
- Tubing clips and wall anchors
- A pipe cutter and a bevel tool
- Thread sealant tape, wrenches and a screwdriver
- Safety glasses and work gloves
Mount the Main Line and Cut the Pipe
Run the main line high on the wall or along the ceiling, where it stays out of the way. Set the clips first, spacing them so the pipe cannot sag. Use anchors that suit your wall material, and be sure each clip sits in solid framing or masonry.
Give the main line a slight slope toward a drain point. Compressed air carries moisture, and water follows gravity. Slope the line so water collects at a low spot rather than traveling to your tools.
To cut the pipe, mark it, make a straight cut with a pipe cutter, and then bevel the inside and outside edge with the bevel tool. A square cut and a clean bevel protect the O-rings inside the fitting. A rough or angled cut is a common cause of leaks.
Wear safety glasses while cutting and beveling. Use a stable ladder for ceiling work, and ask a helper to hold it if you are working alone at height.
Step by Step: Build the System
Work from the compressor end toward the far end of the shop. This order makes it easier to keep the slope consistent.
- Turn off and unplug the compressor, and drain the tank. Never work on a system that has power or pressure.
- Connect a short length of flexible hose or a connector from the compressor outlet to the start of your pipe. Do not run rigid pipe directly from the compressor, since vibration and heat from the pump can stress the joints.
- Slide the compression nut and ferrule onto the pipe, push the pipe fully into the fitting, and tighten with two wrenches so the fitting does not twist.
- Install tees at each drop location, with the branch pointing up. Then run a short pipe down to an outlet block. Taking the drop off the top of the main line keeps water from flowing straight down into your tools.
- Add a drain valve at every low point and at the end of the main line. A kit such as the MOLAVIEE 200 ft listing includes five 3/8 in NPT drain valves, which is a useful reference for how many to plan.
- Seal threaded connections, such as plugs and drain valves, with thread sealant tape wrapped in the direction of the threads.
- Secure the pipe with clips as you go, and keep bends within the manufacturer's stated radius so the pipe does not kink.
Test for Leaks Before You Rely on It
Close every drain valve and cap any unused outlet with a plug. Plug in the compressor and bring the system up to pressure slowly, not all at once. Stay clear of the pipe while it fills, and wear eye protection.
Brush or spray soapy water on each joint and look for bubbles. Tighten any fitting that bubbles, or release the pressure, take it apart and check the pipe cut and O-ring. If the compressor keeps cycling after you shut it off, you probably still have a leak.
Never go above the pressure rating of your pipe and fittings. Set your regulator and tank switch so the system stays inside the rated limit for the temperature in your shop. If your compressor makes more pressure than your pipe allows, do not connect it until you have a safe solution.
If you want to compare the connection parts themselves, see our best air compressor fittings page.
Maintain the System Over Time
Hard piping is low-maintenance, but not no-maintenance. Open the drain valves regularly, especially in humid weather, to let collected water out. Do this with the system under low pressure and point the valve away from you.
Check fittings now and then, because temperature changes can loosen connections. If you add a drop later, release all pressure first and use the same cutting and beveling steps.
Keep the pipe away from hot surfaces, since the pressure rating drops as temperature rises. Do not drill or screw into the wall near the line without checking where it runs.
Frequently asked questions
Can I bury HDPE-aluminum air pipe?
Several kit listings say the pipe can be buried, but check the instructions for your product. Use proper depth and protect the fittings, and pressure test the line before covering it.
Can I paint the pipe?
Some kit makers say their pipe can be painted. Check your product instructions, and use a paint that is safe for polyethylene.
Do I need a regulator on each drop?
Not always. One regulator near the compressor sets the line pressure. Add a regulator and filter at a drop if a tool needs lower or cleaner air.
Will hard piping make a small compressor stronger?
No. Piping improves delivery to the tool and reduces hose clutter, but it cannot add airflow. Match your compressor to the tools you use.
Can I hire someone instead?
Yes. If your system uses high pressure, runs through walls or needs electrical work for the compressor, a licensed professional is a sensible choice.