How to Hang Garage Wall Cabinets and Storage Racks
Hang garage wall cabinets and racks by fastening them into wall studs (or masonry with the right anchors), never into drywall or paneling alone. Mark a level line, support the cabinet on a temporary ledger, drive structural screws through the cabinet's mounting rail into at least two studs, then load it gradually. Racks follow the same idea: find the studs, level the brackets, and keep the total load well under what the fasteners and shelves can carry.
 Letaya 01Best overall
 Yizosh 72HLC-1850Top shelf rating, tied
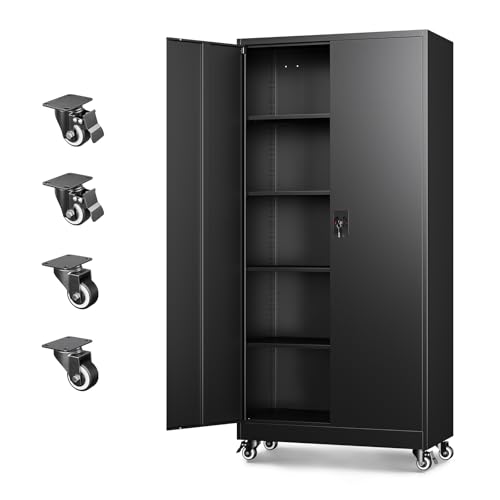 Letaya R694Rolling with wall mounting
Plan the wall and the load first
Before you pick up a drill, decide what will live on the wall. A cabinet full of paint cans, power tool batteries and hardware can be far heavier than it looks, and the wall has to carry all of it. Add up your heaviest shelf loads, then add the weight of the empty cabinet itself.
Next, check what the wall is made of. Most garage walls are drywall over wood studs, but some are bare studs, plywood, concrete block or poured concrete. Each type needs a different fastener, and drywall by itself will not hold a loaded cabinet.
Think about the space around the cabinet too. Leave room for doors to swing, for a car door to open, and for you to stand and reach. Keep wall cabinets away from the path of a garage door track and any ceiling-mounted opener.
Gather tools and hardware
Most jobs need only basic tools. A stud finder helps, but confirm what it says by tapping and drilling a small test hole. Use a long level, because a short one lets small errors add up across a wide cabinet.
Use the fasteners the cabinet maker recommends if they are supplied. If you replace them, choose structural cabinet screws or lag screws long enough to pass through the cabinet rail and drywall and bite well into the stud.
- Stud finder, tape measure and pencil
- 4 ft level or a laser level
- Cordless drill and driver bits, plus a socket set for lag screws
- Structural cabinet screws or lag screws, with washers
- Concrete sleeve or wedge anchors if the wall is masonry
- A scrap 2x4 or ledger board to support the cabinet while you fasten it
- Safety glasses, hearing protection and a dust mask for drilling into masonry
Match the fastener to the wall
The wall material decides how you attach things. Always drive the main fasteners into framing or masonry, and treat drywall anchors as suitable only for very light items.
| Wall type | Best attachment | Notes |
|---|---|---|
| Drywall over wood studs | Structural screws or lag screws into studs | Pre-drill a pilot hole and hit at least two studs per cabinet |
| Bare studs or plywood sheathing | Screws into studs, or into plywood over a stud | Plywood alone is weaker than a stud, so aim for studs |
| Concrete or block | Sleeve or wedge anchors, or masonry screws | Use a hammer drill and the bit size the anchor calls for |
| Metal studs | Toggle bolts rated for the load, or add wood backing | Ask a pro before hanging heavy loads |
Hang a wall cabinet step by step
Take your time with the layout. A cabinet that is slightly off level will cause doors to swing open or closed on their own, and rework on a heavy cabinet is awkward.
One common approach is to set the bottom of upper cabinets high enough that you can work on a bench or put items beneath them, often somewhere around 58 in off the floor. Adjust to your height and what sits below. The key point is to pick a number and mark it consistently.
- Find and mark the studs. Studs are commonly spaced 16 in apart on center, but check your wall rather than assuming.
- Draw a level line at the bottom of the cabinet and screw a temporary ledger board just below it, fastened into studs.
- Remove the doors and shelves if you can, because a lighter cabinet is easier to lift and align.
- Rest the cabinet on the ledger and check that it is level and plumb. Shim gaps if the wall is uneven.
- Pre-drill, then drive screws through the mounting rail into each stud you hit. Snug them, check level again, then tighten fully.
- Replace the doors and shelves, remove the ledger, and load the cabinet gradually while watching for movement.
Anchor tall cabinets and hang storage racks
Tall cabinets are a tipping risk when the upper shelves are heavy or a door is open, so anchor them even if they feel stable. For example, our top-ranked Letaya 72 in cabinet lists pre-holes on the back for wall mounting, which is exactly the kind of feature to use. Our best garage storage cabinets page notes which models list wall mounting and which list casters. The BIG RED 8-piece set lists that its tall cabinets can optionally be fixed to the wall, and you should take that option.
Rolling cabinets need extra care. Casters make them easy to move, but a loaded cabinet on wheels can shift or tip when pushed. If a rolling model has wall-mount holes, such as the Letaya model with detachable wheels, consider removing the wheels or at least anchoring it once it is in position.
For storage racks, the method is similar. Locate studs, mark a level line, and fasten each bracket or rail into framing. Space brackets so the shelf rests on a stud-mounted support every 16 in or so, and place the heaviest items low. Overhead racks need extra caution: use a ladder in good condition, keep a helper nearby, and never load above the rack's rated capacity. Stay out from under a rack while it is being loaded.
Building your own cabinets or racks
If you build instead of buy, the same rules apply. Use plywood or 2x lumber for the box and shelves, and attach a solid hanging rail (often a strip of plywood or a cleat) across the back so the screws land in studs, not in thin panel stock.
A French cleat is a popular and strong method: a 45 degree cut strip fastened to the wall, with a matching strip on the cabinet that hooks over it. It makes leveling simple and lets you lift the cabinet off later.
Shelves made from plywood sag over wide spans, so add a front edge strip or keep spans short. If you want a finished, rated product with locking doors and known dimensions, comparing options on our garage cabinet comparison can save time over building from scratch.
Safety note for building: wear eye and hearing protection when cutting or drilling, and keep power cords clear of blades and drill bits. Check for wiring and pipes inside the wall before drilling deep holes.
Final checks and safety
When everything is installed, test the cabinet by pulling gently down and outward on the front. There should be no flex, shifting or creaking at the wall. If you see gaps opening, stop and add fasteners.
Keep flammable liquids, fuels and chemicals in appropriate containers, and follow the product label on storing them. A closed steel cabinet is not automatically a rated flammable cabinet, so do not assume it is one unless the maker says so.
Keep walkways clear below racks and make sure the cabinet does not block a water heater, furnace, electrical panel or gas shutoff. Those need clear access, and some must keep clearances set by code or the manufacturer.
Frequently asked questions
How many studs should a wall cabinet be attached to?
Aim for at least two, and more for wide or heavy cabinets. Hitting a stud at each end of the mounting rail gives the best hold.
Can I hang a cabinet on drywall anchors only?
Not for a loaded garage cabinet. Toggle or plastic anchors are for light items. Use studs or masonry anchors for anything heavy.
Should I take the doors off before hanging?
Yes, if the hinges allow it. A lighter cabinet is easier to lift and level, and doors will not swing during the lift.
How do I find studs if my stud finder is unreliable?
Tap the wall for a solid sound, look for nail or screw lines along trim, and confirm with a small pilot hole or a thin nail before drilling the final holes.
Can a rolling cabinet be wall mounted?
Some can. If the listing shows wall-mount holes, anchor it in place and lock or remove the wheels so it cannot shift.