How to Build Garage Storage Cabinets Step by Step
Build a plywood box from 3/4 inch sheet stock, join it with glue and screws, add a thin back panel, hang two doors on hinges, and anchor the finished cabinet to wall studs. A single 72 by 36 by 18 inch cabinet is a realistic weekend project if you have a circular saw or table saw, a drill and a square. If you would rather skip the carpentry, a steel cabinet is the faster route.
 Letaya 01Best overall
 Yizosh 72HLC-1850Top shelf rating, tied
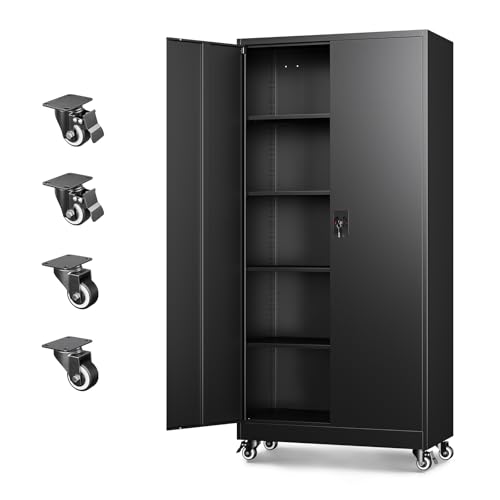 Letaya R694Rolling with wall mounting
Plan the cabinet before you cut
Start with the wall. Measure the width and height you can spare, then check that the doors can swing fully without hitting a car, a water heater or a door frame. Leave room in front of the cabinet for you to stand and reach in.
A good first size is 72 inches tall, 36 inches wide and 18 inches deep. That is the same footprint as the Letaya 72 inch steel cabinet, which lists 72 by 36 by 18 inches, so you can compare your plan against a ready-made model. Eighteen inches of depth holds paint cans and bins without eating too far into parking space.
Decide what the cabinet will hold. Heavy items such as paint, tools and cases of fluid need thicker shelves and closer supports. Light items like sports gear can sit on longer spans. Sketch the layout, mark where each shelf will go, and write down a cut list before you buy anything.
Tools and materials
Garage cabinets are simple boxes, so the tool list is short. Buy a little extra plywood and hardware, since mistakes and splintered edges happen.
- Two sheets of 3/4 inch plywood for the sides, top, bottom, shelves and doors, plus one sheet of 1/4 inch plywood for the back
- Circular saw with a straight edge guide, or a table saw
- Drill and driver, with a countersink bit
- Wood glue and 2 inch construction screws
- Four overlay hinges (two per door), door pulls and a magnetic or roller catch
- Shelf pin jig and pins if you want adjustable shelves
- Tape measure, carpenter's square, level and clamps
- Stud finder and 3 inch screws for anchoring
- Safety glasses, hearing protection and a dust mask
Cut list for a 72 x 36 x 18 inch cabinet
Plywood is sold in 4 by 8 foot sheets, so one sheet yields the sides and top and bottom, and the second covers shelves and doors. Cut slowly, support the sheet so the offcut does not pinch the blade, and mark each piece with a pencil as you go.
The table below uses 3/4 inch plywood unless noted. Dimensions are for a basic design, so adjust them to suit your wall.
| Part | Qty | Size (inches) |
|---|---|---|
| Side panels | 2 | 72 x 18 |
| Top and bottom panels | 2 | 34.5 x 18 |
| Shelves | 4 | 34.25 x 17.25 |
| Doors | 2 | 17.75 x 71 (adjust for hinge overlay) |
| Back panel (1/4 inch) | 1 | 36 x 72 |
| Toe kick strip | 1 | 34.5 x 3.5 |
Assemble the box
Work on a flat floor or a pair of sawhorses. Check that every piece is square before you fasten anything, because a box that starts crooked will never hang doors well.
- Drill pilot holes and countersink them so screw heads sit flush.
- Glue and screw the top and bottom panels between the two side panels. Set the bottom panel about 3.5 inches above the floor edge to leave room for the toe kick.
- Check the box with a square, or measure both diagonals. They should match.
- Tack the 1/4 inch back panel to the rear with glue and small screws. It keeps the cabinet from racking and holds it square.
- Drill two rows of shelf pin holes inside each side panel, using a jig so every hole lines up.
- Cut the shelves slightly short so they slide in easily, then drop them on the pins.
Hang the doors
Doors are where most beginners struggle, so take your time. Overlay hinges sit on the outside edge of the box and let the door cover the front of the cabinet. Mark the hinge positions about 4 to 6 inches from the top and bottom of each door.
Attach the hinges to the doors first, then hold each door against the cabinet and fasten the hinge plates. Use a thin spacer, such as a pair of playing cards, between the two doors to get an even gap. Most hinges let you fine-tune the position with a small adjustment screw.
Add pulls and a catch last. If the cabinet will hold chemicals, tools or anything you want to keep from children, add a hasp or a keyed cabinet lock. For comparison, the Yizosh steel cabinet lists doors that open 180 degrees, which is handy in tight spaces. Wood doors on standard hinges usually open around 90 to 110 degrees, so leave extra clearance.
Anchor it and finish the job
A tall cabinet full of heavy items can tip forward, especially if a child pulls on an open door. Always anchor it. Use a stud finder, mark the studs, and drive 3 inch screws through a solid strip along the top of the back into at least two studs. If your wall is masonry, use proper masonry anchors instead.
Sand the edges, then seal the plywood with paint or a clear coat. Sealing helps protect the wood from the moisture and temperature swings common in garages. Keep the heaviest items on the lower shelves, and spread loads evenly.
Remember that a steel cabinet is the opposite trade-off. Our best garage storage cabinets page shows shelf ratings from 40 lb to 180 lb on models that list them, and several list 0.8 mm steel. A homemade plywood cabinet has no published rating, so judge it by how it holds up and keep loads reasonable.
Safety notes
Wear safety glasses and hearing protection whenever you run a saw or drill. Plywood dust irritates lungs, so wear a dust mask, work with good airflow and clean up with a vacuum rather than a broom.
Keep blades sharp and clamp your work. Never reach under a sheet you are cutting. Use a stable stepladder if you need to reach the top of the cabinet, and ask a helper to hold the box upright while you anchor it.
Check for wiring, pipes or gas lines before drilling into a wall. If you are unsure what is behind the wall, use a detector or call a professional. Avoid storing paint, solvents or gas cans near water heaters or other ignition sources.
Build or buy?
Building gives you a custom size and a finish you choose, but it takes tools, space and time. A ready-made steel cabinet arrives with the doors, locks and shelves already designed. Some, like the Letaya rolling model, list wall pre-holes and detachable wheels, and the BIG RED set covers 130 inches of wall with a workbench.
If your plan keeps growing, compare specs on our best garage storage cabinets page before you commit to lumber. It lists width, depth, shelf rating and features side by side, and notes where a listing leaves a spec out.
Frequently asked questions
What plywood thickness is best for garage cabinets?
Three-quarter inch plywood is the usual choice for sides, tops and shelves because it holds screws well and resists sagging. Use 1/4 inch for the back panel.
Can I use MDF or particleboard instead?
You can, but garages see damp and temperature swings, and these materials swell if they get wet. Sealed plywood is a safer choice for most garages.
How do I stop shelves from sagging?
Keep spans short, use shelf pins or cleats on both sides, and place the heaviest items near the lower shelves. You can also glue a hardwood strip to the front edge to stiffen it.
Should I add wheels to a homemade cabinet?
Only for lighter loads. A tall, heavy cabinet on casters can tip or roll, so use locking wheels and anchor it to the wall if it must stay in one place.
How long does the build take?
Many first-timers need a full weekend, with cutting and assembly on day one, and doors, finish and anchoring on day two.