How Quick Connect Air Fittings Work
A quick connect air fitting is a two-part system: a coupler on the hose or tool side and a plug on the other. When you push the plug in, spring-loaded locking balls drop into a groove on the plug and hold it, while an internal seal keeps the air from escaping. To release it, you slide the sleeve back and the plug pulls free.
 Ailbiuko aircoupler_plug-iron-45pcsBest overall
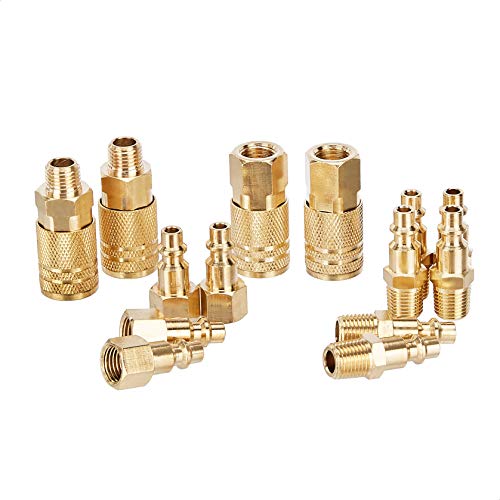 Amazon Basics A140001Brass starter set
 SOKOSEY 20SMmutou2packsReplacement M/D couplers
The two parts: coupler and plug
Every quick connect system has two halves. The coupler is the socket with the moving sleeve. The plug (sometimes called a nipple) is the simple, grooved stem that slides into it.
Each half also has a threaded end. That end screws onto your compressor outlet, hose, regulator or tool. Couplers go on one side of a connection and plugs on the other, so you need both to make a working link. Our best air compressor fittings page compares kits by how many of each they include.
What happens inside when you connect
Inside the coupler is a ring of small steel locking balls, a spring-loaded sleeve and a rubber seal. When you pull the sleeve back, the balls can move outward and make room for the plug.
As the plug enters, it presses past the seal. Release the sleeve and the spring pushes it forward, forcing the balls inward into the groove on the plug. That locks the plug in place mechanically, and the seal around the stem keeps the air inside the line.
Air pressure itself tries to push the plug back out. The balls resist that force, which is why a worn groove, damaged balls or a weak spring can lead to a plug that slips or leaks.
- Sleeve pulled back: balls move outward and the plug can slide in.
- Sleeve released: spring pushes the balls into the plug groove.
- Seal compresses around the plug: air stays in the line.
- Sleeve pulled back again: balls clear the groove and the plug comes out.
How to connect and disconnect, step by step
The steps are simple, but the order matters for safety. Always shut off the air or relieve pressure before you work on threaded joints.
- Turn off the compressor or close the tank valve, and release pressure from the line if you are changing fittings.
- Wrap the male NPT threads with thread seal tape and snug the fitting by hand first, then finish with a wrench. Do not over-tighten.
- Pull the coupler sleeve back (on a standard sleeve type) and push the plug in until it seats.
- Release the sleeve and give the hose a gentle tug to confirm it is locked.
- To disconnect, pull the sleeve back and let the plug slide out. Hold the hose end, since trapped air may release a small puff.
| Style | How you connect | How you disconnect |
|---|---|---|
| Sleeve-style coupler | Pull sleeve back, insert plug, release | Pull sleeve back, remove plug |
| Push-to-connect coupler | Push the plug straight in, no sleeve pull needed | Pull sleeve back, remove plug |
How push-to-connect couplers differ
Push-to-connect couplers use the same ball-locking idea, but the design lets the plug force the balls aside as it goes in. Some listings describe this as fully automatic coupling without pulling the sleeve back. Release is typically still done by sliding the sleeve.
In our data, the RNSXYAT 14-piece kit lists a push-in design with 6 locking balls inside the connector. The WORKPRO 16-piece kit also lists 6 locking balls per female coupler, while the Ailbiuko 45-piece kit lists 4 locking balls. Comparing those numbers helps, but see our fittings comparison for the full spec lists, since ball count is only one factor in how well a fitting holds.
Matching the right parts
Quick connect parts only work together when the profile matches. Most kits we compare list Industrial (M/D), which is meant to interchange across makers. Mixing profiles can latch but leak badly, and the plug may be hard to remove.
Thread size matters too. The kits we compare list 1/4 in NPT threads. If your compressor or hose uses a different thread, these will not seal. Also check what material and pressure rating are listed. Several kits list 300 psi, but some makers do not publish a rating, so check before using one on a high-pressure line.
Brass resists corrosion and wear. The Ailbiuko kit lists brass and plated steel, so read each listing for what the body is made of.
Troubleshooting and safety
If a connection hisses, first check the thread tape and the plug profile. Then look at the seal and the plug for wear or dirt. Replace worn parts rather than forcing them.
Safety notes:
- Wear eye protection when connecting, disconnecting or blowing air. A loose plug can fly out under pressure.
- Never exceed the lowest pressure rating in the system, including the hose and tool.
- Release pressure before changing threaded fittings.
- Do not point air at skin. Compressed air can injure.
- Wear hearing protection near running compressors.
Frequently asked questions
Can I mix different brands of quick connect fittings?
Often yes, if they share the same profile, such as Industrial (M/D). Always check the profile and thread size first, because mismatched profiles can latch but leak.
Do quick connect fittings need thread tape?
The threaded end usually does when it is NPT, since tape helps the threads seal. Not every kit includes it. Our data lists tape with some kits, such as the Ailbiuko and WORKPRO sets, but not the Amazon Basics kit.
Why does my plug leak after connecting?
Common causes are mismatched profiles, a worn seal, a damaged plug or missing thread tape on the threaded end. Check each in turn and replace worn parts.
Do I need both couplers and plugs?
Yes. A coupler mates with a plug, so each connection needs one of each. Some packs have only couplers or only plugs, so check what is included.